

حل مشكلة عدم ظهور الشبكات و الشير في ويندوز Windows 10
يواجه مستخدمى ويندوز 10 وتحديداً المستخدمين الذين قاموا بالتحديث والترقية إلى إصدار رقم v1803 مشكلة أن الشبكة لا تظهر في الكمبيوتر عند النقر أو الضغط على أيقونة الوايرلس بشريط المهام ، فما العمل وكيف يتم تجاوز هذه المشكلة .. ؟
تابع معنا، هنا سنقوم بإستعراض مجموعة من الحلول التى من المؤكد أنها ستفيدك فى تجاوز وحل هذه المشكلة التى هى بالتأكيد مصدر إزعاج لبعض مستخدمى نسخة ويندوز 10 إصدار v1803، إليكم أهم الحلول .
:: تحديث تعريف كرت الوايرلس
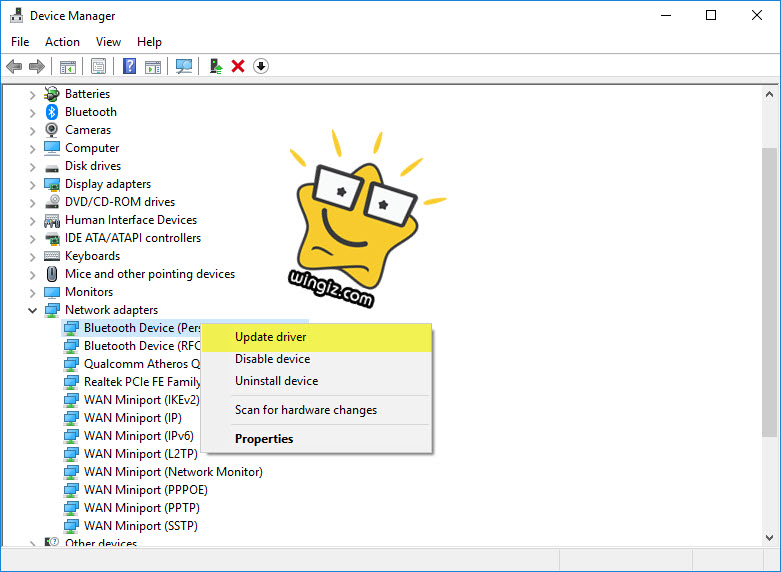
أول شىء نقوم به على الكمبيوتر والجهاز الذى يعانى من هذه المشكلة هو تحديث تعريف كرت الشبكة أو الوايرلس . للبدء، أنقر على علامة وشعار الويندوز + حرف R فى الكيبورد لفتح قائمة الران، ثم بعد ذلك أنسخ هذا الأمر devmgmt.msc ثم لصقه فى نافذة الران والنقر على ok أو enter، الأن تفتح معك نافذة مدير الأجهزة " Device Manager " كما فى سكرين شوت أعلاه .
الأن، سيكون عليك تطبيق الخطوات كما فى سكرين شوت أعلاه لتحديث كرت الشبكة فى جهاز الكمبيوتر الخاص بك، وفى حالة إذا لما تنجح هذه الخطوة معك سيكون عليك متابعة الخطوات التالية .
:: إعادة تعيين إعدادات Winsock
تشغيل cmd كمسؤول ثم أدخل الأوامر التالية واحدًا تلو الآخر واضغط على Enter بعد إدخال كل أمر :
netsh winsock reset netsh int ip reset
ipconfig /release
ipconfig /renew
ipconfig /flushdns
ثم فى الأخير، قم بإعادة تشغيل جهاز الكمبيوتر .
:: التحقق من تشغيل Resource Publication Service
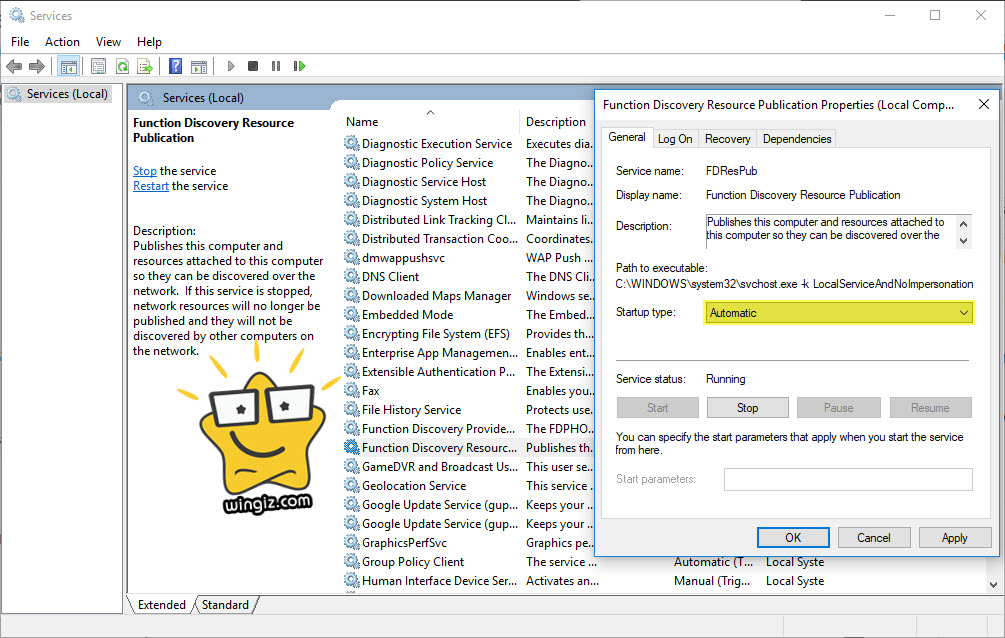
أنقر على شعار الويندوز + حرف R ثم أنسخ الأمر هذا services.msc ولصقه فى قائمة الران وأنقر على OK، أنقر كليك يمين على خيار " Function Discovery Resource Publication " ثم تأكد من تشغيل هذه الخدمة " Automatic " . كما فى سكرين شوت أعلاه .
:: تأكد من تمكين SMB 1.0 يدويًا
تأكد من تمكين SMB 1.0. ستتمكن من القيام بذلك من خلال لوحة التحكم كنترول بانل " Control Panel " > البرامج والمميزات " Programs & Features "> تشغيل ميزات Windows أو إيقاف تشغيلها "Turn Windows features on or off " .
:: إعادة تعيين الشبكة
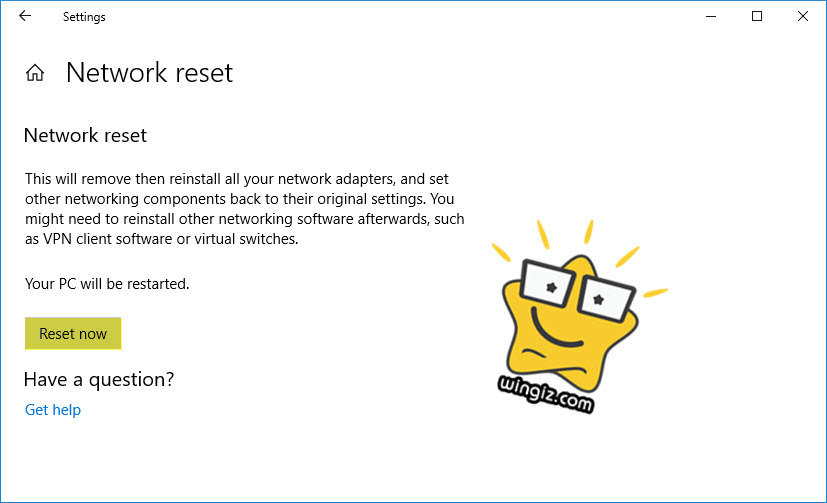
فى حالة إذا فشلت جميع الحلول المذكورة أعلاه، سيكون أمامك حل أخير وهو إعادة تعيين إعدادات الشبكة فى الكمبيوتر الخاص بك بالكامل . للبدء، أنتقل إلى الإعدادات ومن ثم أنقر على قسم " Network and Internet " ثم بعد الدخول لنافذة إعدادات الشبكة تقوم بالنزول لاسفل والنقر على خيار " Network Reset"
This has been a problem since Windows 7 for me and what always solved it was enabling "use user accounts and passwords to connect to other computers" on ALL computers in my two different networks. This way I never had network issues. Now since the dilettantes at Microsoft removed this feature and homegroup I've been having constant network issues.When Microsoft removed Homegroup from Windows v1803 and it effect all sharing. Here is some things you can do.
To get you PC's to visible under File Explorer network section then most important part is to start some required services.
Push Win Key and type "Services", locate those services, start them and set Start type to Automatic (Delayed Start).
Services are:
- Function Discovery Provider Host
- Function Discovery Resource Publication
- SSDP Discovery
- UPnP Device Host
You can use \\IP, but you can't use \\Name is because Win v1803 can't create link between IP-address and PC name. This link can be created using hosts table (very old technique from 60's). See step 6 on my example.
https://answers.microsoft.com/en-us/...a-116696b20743
المرجع:Open Start > Settings > Update & security > Troubleshoot
Scroll down
Click Network adapters
Click Run the Troubleshooter
When complete, restart to see if the problem is resolved.
If not, press Windows key + X
Click Device Manager
Expand Network adapters
Right click your adapter
Click Uninstall
Exit Device Manager, restart. Windows 10 should detect the network adapter then reinstall it. Check if you can connect and browse.
also try:
Open Start > Settings > Network & Internet > Status
Scroll to the bottom then click Network reset.
Other things you can try:
Open Start > Settings > Network & Internet > Status
Scroll to the bottom
Click Network and Sharing Center
Click Change advanced sharing settings
Expand All Networks
Under Password protected sharing
Switch between 'Turn on password protected sharing and Turn off password protected sharing'
Then choose 'Turn off password protected sharing'
Then click 'Save changes'
Also:
Press Windows key + R
Type: optionalfeatures.exe
Hit Enter
Scroll down to SMB 1.0/CIFS File Sharing Support
Tick the SMB 1.0/CIFS Client
Untick SMB 1.0/CIFS Automatic Removal and
Untick SMB 1.0/CIFS Server
Click OK
Restart if prompted.
https://answers.microsoft.com/en-us/...ee20bee?page=2
+ إنشاء موضوع جديد
النتائج 1 إلى 2 من 2
-
04-10-2018, 21:50 #1Status
- Offline

- تاريخ التسجيل
- Apr 2014
- الدولة
- Egypt
- المشاركات
- 4,703
 Engineering and Technology
- معدل تقييم المستوى
- 10
 حل مشكلة عدم ظهور الشبكات و الشير في ويندوز Windows 10
------------------------------------------------------------------------
حل مشكلة عدم ظهور الشبكات و الشير في ويندوز Windows 10
------------------------------------------------------------------------
شركة رايز للهندسة و التكنولوجيا Rise Company for Engineering & Technology
------------------------------------------------------------------------
Web Hosting | Web Designing | E-Marketing
رقم # 1 فى خدمات الشركات Business Services
استضافة مواقع Web Hosting - عمل ايميل شركة Business Emails
تصميم موقع شركة Web Design - تسويق الكترونى على جوجل Google Adwords
www.rise.company | www.rise.company/emails
ملحوظة : جميع خدماتنا مخصصة للشركات فقط وغير متاحة للافراد
وليس لنا اى منتجات او صيانة نهائيا! يرجى الانتباه الى ذلك.
-
04-10-2018, 22:04 #2Status
- Offline
- تاريخ التسجيل
- Apr 2014
- الدولة
- Egypt
- المشاركات
- 4,703
Engineering and Technology
- معدل تقييم المستوى
- 10
رد: حل مشكلة عدم ظهور الشبكات و الشير في ويندوز Windows 10
Homegroup removed! How to get network sharing work with Windows 10 v1803.
Here is short description how I get my network sharing work with Windows 10 v1803.
(I haven't never use Homegroup so I start directly from step 2.)
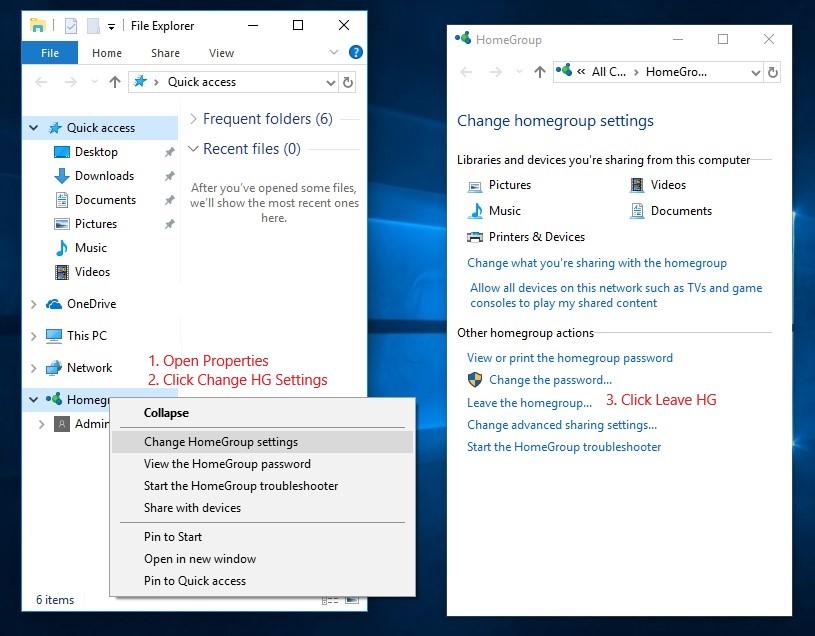
1. Only for those PC's which are still using Windows 10 v1709 or older:
Disconnect from non-existing Homegroup if you have used it.
2.1. All PC's: Check Network profile and Network discovery and Share settings
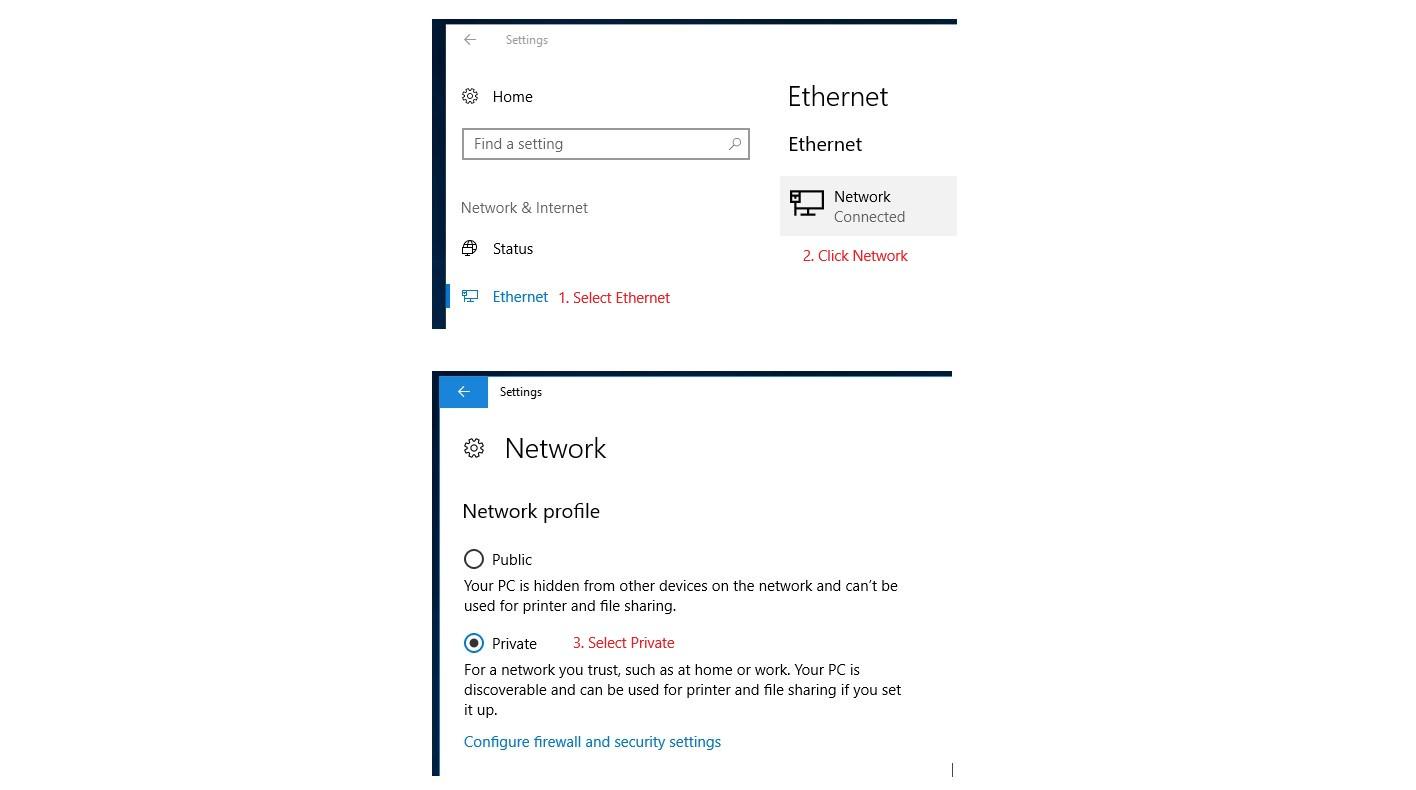
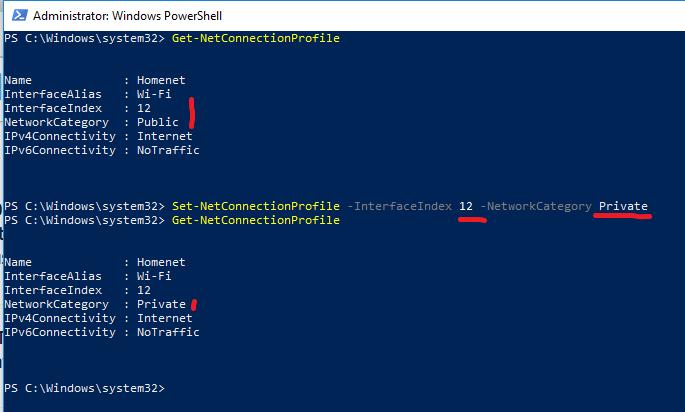
Sometimes this selection to change between Private and Public network profile is missing from Settings / Networks page. In that case profile must change by PowerShell. Right Click Windows Icon (Start button) and open PowerShell (Admin) and use following commands to get interface index number and change profile to Private (or Public):
Get-NetConnectionProfile
Set-NetConnectionProfile -InterfaceIndex <index number> -NetworkCategory Private
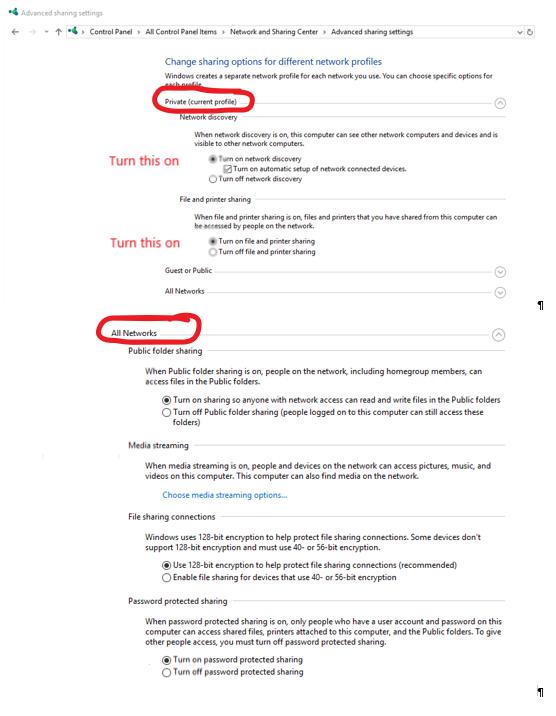
2.2. All PC's: Check Network Discovery and Share settings
3. All PC's: Set Start type to Automatic and start following services that allow PC's to be visible on Network. (Reboot.)
Push Win Key and type "Services", locate these services.
- Function Discovery Provider Host
- Function Discovery Resource Publication
- SSDP Discovery
- UPnP Device Host
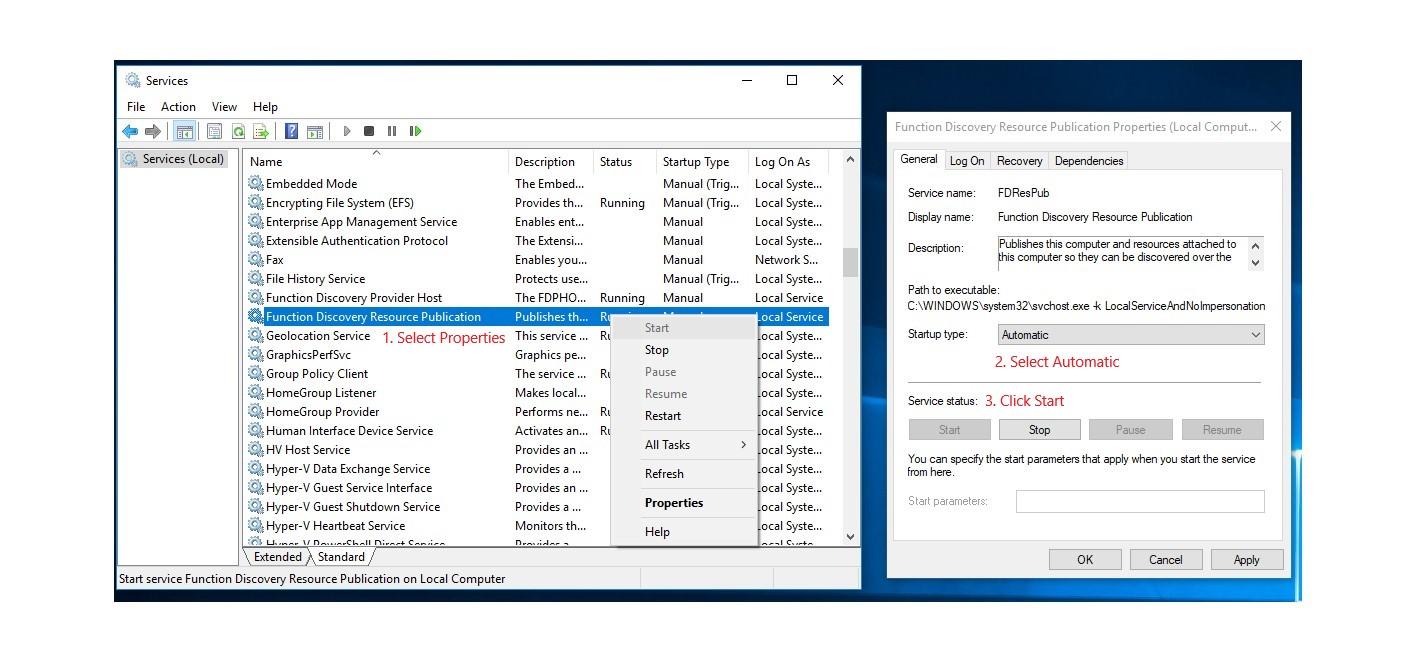
4. Setting shares.
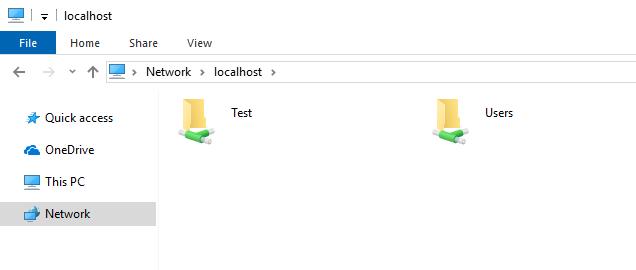
4.1. Check your current shares.
Open file explorer and type \\localhost to address bar to see what shares are made in this computer.
4.2. Create new share (here I use folder "Test").
(Setting "Turn on sharing so anyone …" in Step 2.2. make share for folders in C:\Users automatic.)
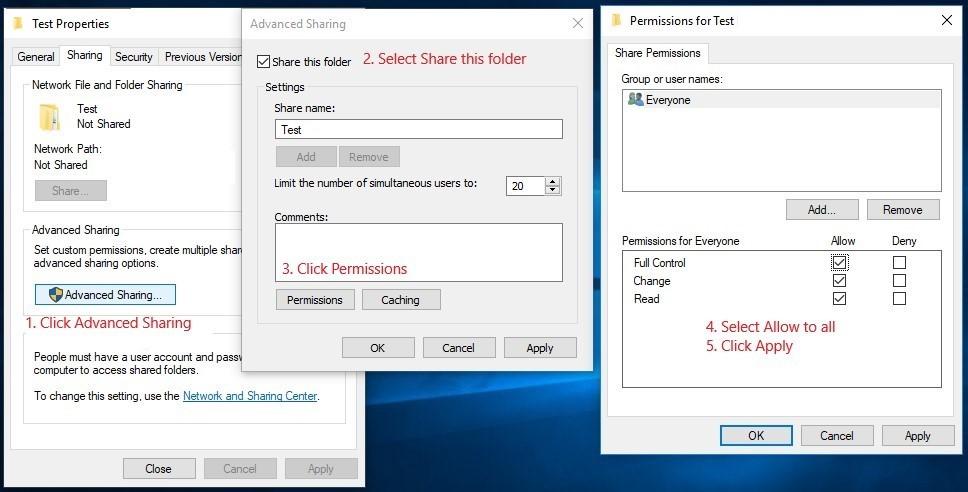
Folder is now shared and Network share path is: \\PCNAME\Test
4.3. Safe way to share folders.
Create user account to all users on your network to whom you want to give access to shared resources.
Use same user ID and password which they have on their own computers.
Right click "Test" and open Properties and select Security tab to see current settings.
Default security settings are shown in next picture.
Those settings allow access to shared folder(s) only for those users who have user ID on that computer.
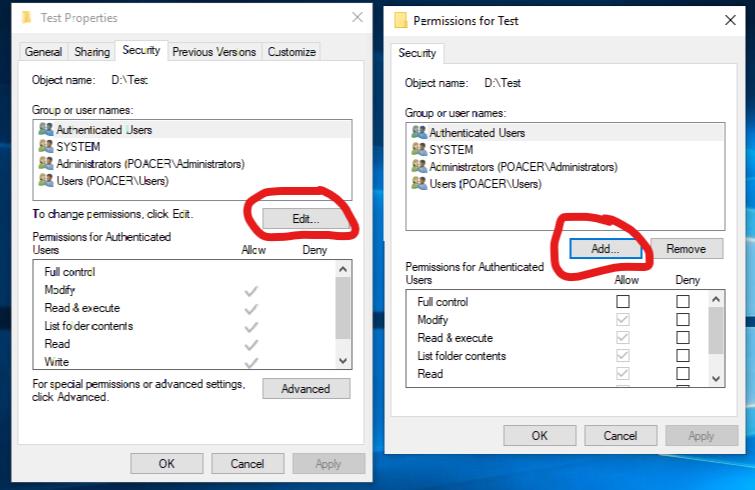
4.4. Sharing folder "Test" to Everyone" (Very unsafe setting! Think carefully do you need to select this!)
If you want that everyone have access to that share then go to Security tab and:
- Click Edit
- On Permission dialog click Add.
- New dialog open and you can add "Everyone" to that list
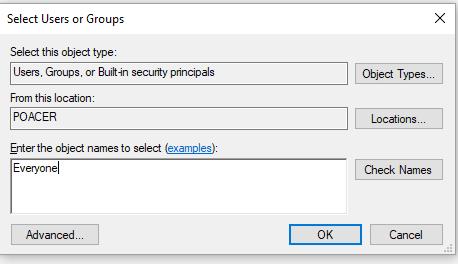
- When back to Permissions dialog select which rights you want to give to "Everyone".
Now anyone on your home network should have access to shared folders without credentials or having user account on your computer.
5. Now when click Network on File Explorer all your PC's should be visible in Computer and Network sections.
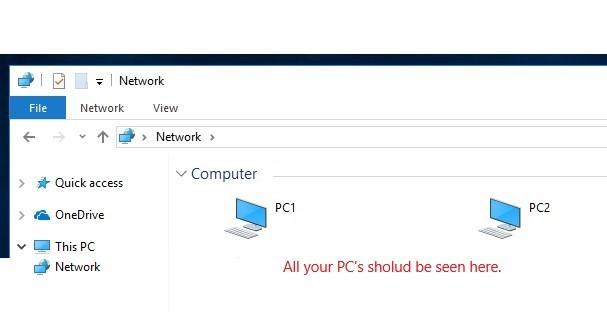
This should be cover the essentials to sharing your data over local network. This share is not limited to C:\Users folder, every folder can be handled like shown in steps 4.
Now your PC's should visible, but if you start getting error message "Windows cannot access \\PC_NAME" you need to go continue to step 6.
6. There is some bug on Windows 10 1803 and because of that PC's can't always connect to each other by Name.
If you get error "\\PCNAME path not found" you can solve this by adding your PC's and IP-addresses to hosts file.
6.1 New routers (or modems) may have feature to remember which IP-addresses are assign to each device, but with older routers (or modems) you have to check that your router or modem is set give predefined IP-addresses linked to each PC's MAC-address.
This way PC's will get same IP-address every time when it ask IP-address form router (or modem) DHCP-server.
There should be some kind of list of PC names with MAC addresses and given IP-addresses of each connected PC.
Picture show that list on my router. In my case with old router I had to select manual assignment in each line.
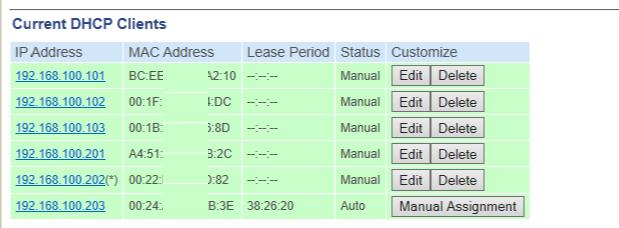
6.2. Add all PC's IP-addresses and Names to C:\Windows\System32\drivers\etc\hosts file.
You can check your IP-address and PC's name by opening command prompt (CMD)
For IP-address type command: ipconfig you get line like this: IPv4 Address ………. 192.168.100.101
For PC name type command: hostname
Take down IP-address and Names of each PC and add those to that hosts file.
To edit copy hosts file to some another location, right click it and use notepad to edit and save it. Replace original file with edited file. Because hosts file is located on system folder replace will ask administrators rights to perform it.
# localhost name resolution is handled within DNS itself.
# 127.0.0.1 localhost
# ::1 localhost
192.168.100.101 PC1 # Ethernet
192.168.100.102 PC2 # Ethernet
192.168.100.202 PC2 # Wi-Fi
المرجع:
https://answers.microsoft.com/en-us/...a-116696b20743
------------------------------------------------------------------------
شركة رايز للهندسة و التكنولوجيا Rise Company for Engineering & Technology
------------------------------------------------------------------------
Web Hosting | Web Designing | E-Marketing
رقم # 1 فى خدمات الشركات Business Services
استضافة مواقع Web Hosting - عمل ايميل شركة Business Emails
تصميم موقع شركة Web Design - تسويق الكترونى على جوجل Google Adwords
www.rise.company | www.rise.company/emails
ملحوظة : جميع خدماتنا مخصصة للشركات فقط وغير متاحة للافراد
وليس لنا اى منتجات او صيانة نهائيا! يرجى الانتباه الى ذلك.

 رد مع اقتباس
المواضيع المتشابهه
-
تنزيل Feature الباك اب Windows Server Backup ويندوز سيرفر windows server 2016
بواسطة Rise Company في المنتدى قسم الويندوز سيرفر Windows Serverمشاركات: 0آخر مشاركة: 04-08-2018, 02:26 -
تنزيل Role تسطيب ويندوز من خلال النتورك WDS ويندوز سيرفر windows server 2016
بواسطة Rise Company في المنتدى قسم الويندوز سيرفر Windows Serverمشاركات: 0آخر مشاركة: 04-08-2018, 01:36 -
تنزيل ويندوز 10 على Virtual Machine ويندوز سيرفر windows server 2016
بواسطة Rise Company في المنتدى قسم الويندوز سيرفر Windows Serverمشاركات: 0آخر مشاركة: 03-08-2018, 20:20 -
افضل شركة تنزيل ويندوز بالاسكندرية - ويندوز مع شهادة ضمان - Windows 10
بواسطة Rise Company في المنتدى خدمات شركة رايز Rise Companyمشاركات: 0آخر مشاركة: 01-06-2017, 12:25 -
( تم الحل ) عندي مشكلة في الصوت فى ظهور علامة x رغم التعريف
بواسطة Eng Amr Adel في المنتدى قسم الاي تي IT مشاكل و حلولمشاركات: 0آخر مشاركة: 27-08-2012, 20:53

المفضلات