

ايبيهات السيرفر للاستضافة المشتركة WHM multiple shared IP addresses
كيفية وضع مواقع السيرفر على ايبيهات مختلفة Dedicated IPs
شرح عمل اي بي اخر للسيرفر مشترك بين المواقع
إعداد عناوين IP مشتركة متعددة في WHM
يحتاج مالكو الخادم إلى عدة عناوين IP مشتركة في الخوادم لتجميع حسابات لكل IP ، وتقليل تأثير هجمات DDOS ، إلخ. ولكن ، WHM يسمح لك أن يكون لديك عنوان IP مشترك واحد فقط بشكل افتراضي. لذلك ، ماذا يمكن أن يكون الخيار التالي؟ لحسن الحظ ، هناك حل بديل لهذا.
كيفية إعداد عدة عناوين IP مشتركة في WHM؟
هناك طريقتان سهلتان لإعداد WHM عدة عناوين IP مشتركة.
How to setup multiple shared IP addresses in WHM?
There are 2 easy methods to setup WHM multiple shared IP addresses.
#################################
1) Reserve the IPs in WHM
#################################
This is one of the easy ways to setup multiple IP addresses in WHM.
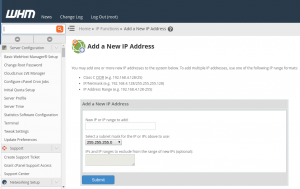
a) Add the new IP address to WHM
Firstly, we add the new IP address to the server.
We add it via WHM from IP Functions > Add a New IP Address option.
b) Reserve the IP addresses
Secondly, we reserve the new IP address in the server.
Therefore, this will prevent the IPs from being used as dedicated IPs for individual cPanel accounts.
To do this, we add the IPs to the reserved list using the below steps.
- Go to WHM > IP Functions > Show/Edit Reserved IPs.
- Check the IP to be reserved and add reason for reserving.
- Click Save.
Alternatively, we add the IPs to be reserved in the file “/etc/reservedips” as shown below.
Here, first parameter is the IP address and the second is the reason for reserving the IP.كود:125.xx.54x.12x = shared ip 125.xx.xx.1x6 = shared ip
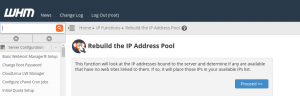
c) Rebuild the IP pool
Next step is to rebuild the IP pool.
This scans and determines the unused IP addresses in the server and adds it to the IP address pool.
As a result, when WHM creates new accounts, it uses the IP addresses from this pool.
Our Support Engineers rebuild the IP address pool from WHM > IP Functions > Rebuild the IP Address Pool.
Alternatively, we use the below script to rebuild the IP address pool.
/scripts/rebuildippool
d) Add the IP in mainips file
For multiple accounts to use these IPs as shared IP addresses, we add them to a pool.
For that, we follow the below steps.
- Create a folder /var/cpanel/mainips if it not exists.
- After that, create a file /var/cpanel/mainips/root.
- Further, add each IP in a single line.
- Finally, save the file.
So, when root creates an account, the first IP address in the file will be used.
Likewise, if a reseller needs multiple shared IP addresses, simply replace this filename with the reseller username.
Also, our Support Engineers create custom scripts in the server for IP rotation so that each IP in the pool gets equally used.
#################################
2) Create Reseller Accounts
#################################
Now, let’s see the second option to use multiple shared IP addresses in WHM.
The idea is to create a reseller account and share the reseller’s IP with the accounts under this reseller.
- Create a new account using the Create a New Account option.
- Then, modify the account and assign Reseller privileges.
- Assign a free IP to that account from Manage Reseller’s Shared IP feature in WHM.
- Go to WHM > IP Functions > Change Site’s IP address area and assign the new IP.
- Then, create new accounts under this reseller and share that IP for these accounts.
You’re done!! You have multiple shared IP addresses on your server.
Conclusion
In short, server owners need multiple shared IP addresses in servers to group accounts per IP, minimize the effect of DDOS attacks. Today, we’ve seen the 2 easy steps to add multiple shared IP addresses in WHM and how our Server Support Engineers implement it
الخلاصة :
اسهل شىء انك تجعل نفسك ريسيلر وهى سهلة جدا بدون مشاكل
ادخل على حسابك modify ثم علم صح على reseller ثم خذ ns2 لك
ثم من Change Multiple Sites’ IP Addresses حول اى حساب تريده.
+ إنشاء موضوع جديد
النتائج 1 إلى 1 من 1
-
19-09-2019, 19:58 #1Status
- Offline

- تاريخ التسجيل
- Apr 2014
- الدولة
- Egypt
- المشاركات
- 4,703
 Engineering and Technology
- معدل تقييم المستوى
- 10
 ايبيهات السيرفر للاستضافة المشتركة WHM multiple shared IP addresses
------------------------------------------------------------------------
ايبيهات السيرفر للاستضافة المشتركة WHM multiple shared IP addresses
------------------------------------------------------------------------
شركة رايز للهندسة و التكنولوجيا Rise Company for Engineering & Technology
------------------------------------------------------------------------
Web Hosting | Web Designing | E-Marketing
رقم # 1 فى خدمات الشركات Business Services
استضافة مواقع Web Hosting - عمل ايميل شركة Business Emails
تصميم موقع شركة Web Design - تسويق الكترونى على جوجل Google Adwords
www.rise.company | www.rise.company/emails
ملحوظة : جميع خدماتنا مخصصة للشركات فقط وغير متاحة للافراد
وليس لنا اى منتجات او صيانة نهائيا! يرجى الانتباه الى ذلك.

 رد مع اقتباس
المواضيع المتشابهه
-
جديد فورتي جيت تحديث اصدار 6.2 FortiGate Firewall v شرح Network Addresses
بواسطة Rise Company في المنتدى قسم فايروول Fortigateمشاركات: 0آخر مشاركة: 03-07-2019, 23:53 -
كود css وضع خلفيتين Multiple Backgrounds فى البودى Body
بواسطة Rise Company في المنتدى قسم لغة HTML/CSS/JavaScriptمشاركات: 0آخر مشاركة: 05-03-2018, 10:47 -
احجز الان,عروض السيرفرات المشتركة,vps,باقل الاسعار المقدمة من مؤسسة تطبيق
بواسطة ttbek.com في المنتدى رايز الإعلانات التجارية Rise Advertiseمشاركات: 0آخر مشاركة: 02-02-2015, 18:10 -
عروض جديده من الكهف للاستضافة
بواسطة cave في المنتدى رايز الإعلانات التجارية Rise Advertiseمشاركات: 0آخر مشاركة: 09-12-2013, 18:50

المفضلات