

السي بانال CPanel اخذ باك اب كامل خارج السيرفر whm backup to Google Drive
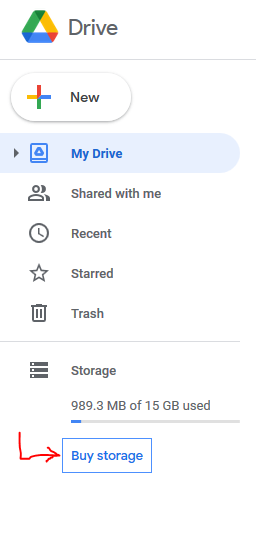
عند فتح حساب جوجل درايف هتجد على اليسار المساحة و اسفلها Buy Storage اضغط عليها
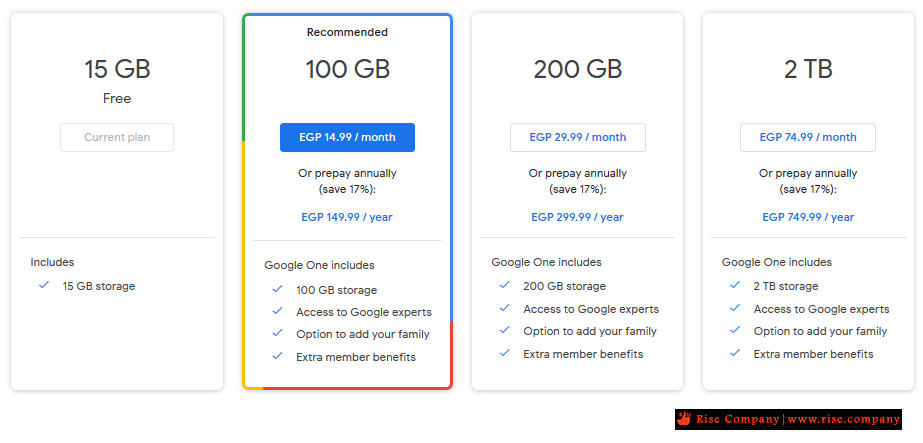
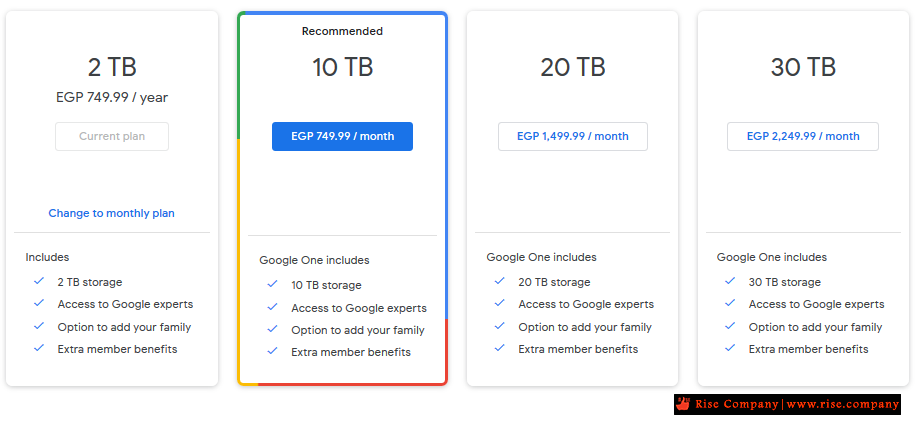
هنا تجد باقات وقد تجد ان الانسب 2tb اذا كان لديك سيرفر كبير وتاخذ باك اب اسبوعيى 4 مرات
بتكلفة 750 ج سنويا ويتم تحصيلها اوتوماتيك من خلال جوجل دون تدخل منك وتامن السيرفر تامين شامل
ملحوظة عند شراء مساحة 2 تيرا هتجد انه متاح انك تعمل Upgrade لباقات تصل الى 30tb
----------------------------------------------------------
5 خطوات لتفعيل اعدادات Google Drive API
----------------------------------------------------------
https://console.developers.google.com/
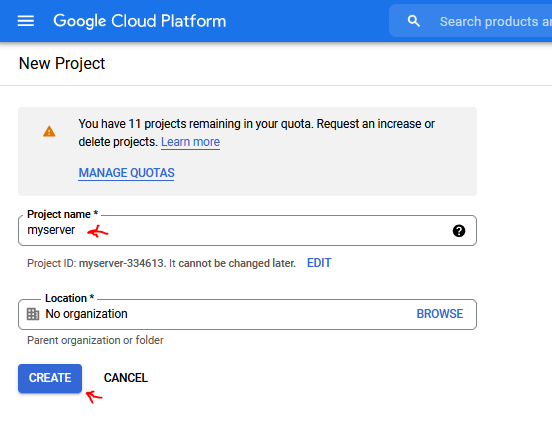
خطوة رقم 1 انشاء بروجكت جديد New Project
واذا كان لديك اكثر من سيرفر اعمل لكل سيرفر project خاص به
حتى لا تواجه مشكلة فى Limit وتتجنب Backup transport errors
هذا هام جدا لا تجمع اكثر من سيرفر داخل مشروع واحد
OAuth rate limits Your token grant rate Token grant rates limit how quickly your application can get new users. Your current per day token grant rate limit is 10,000 grants per day. The per day token grant rate resets every day.
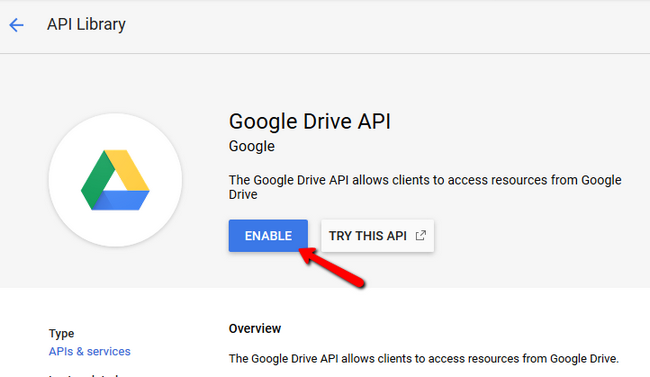
خطوة رقم 2 تفعيل Google Drive API من Library
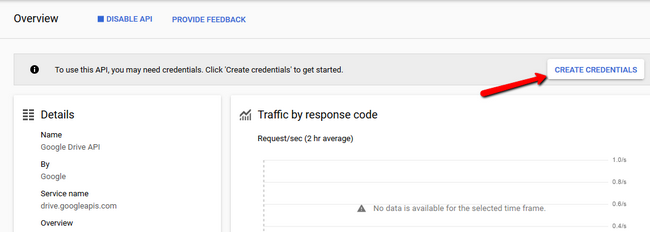
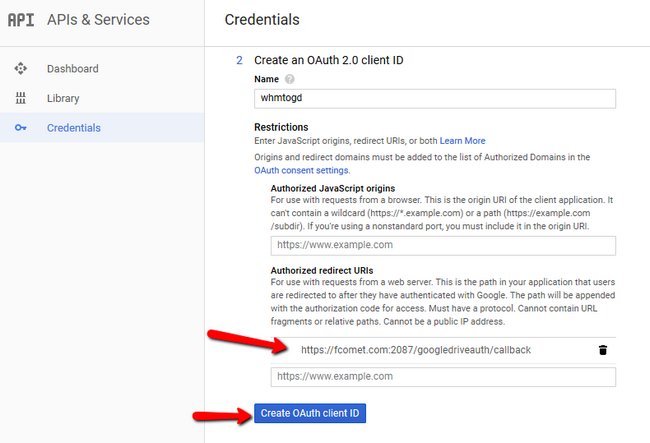
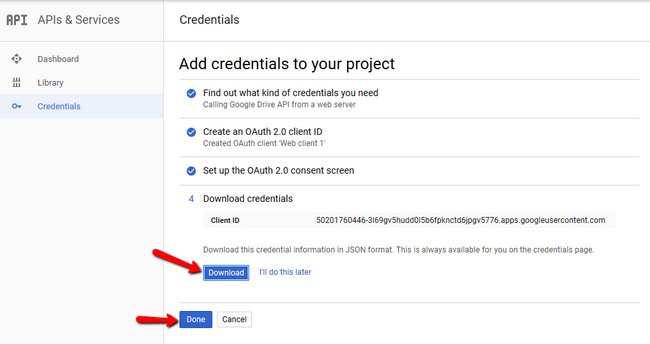
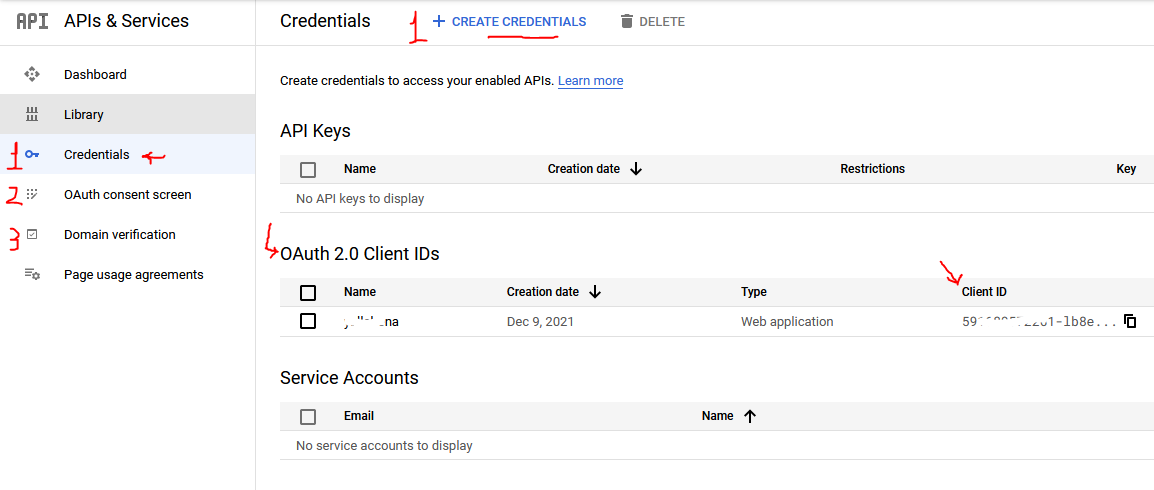
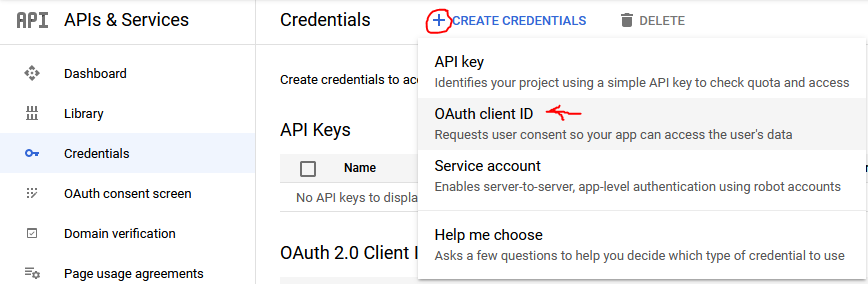
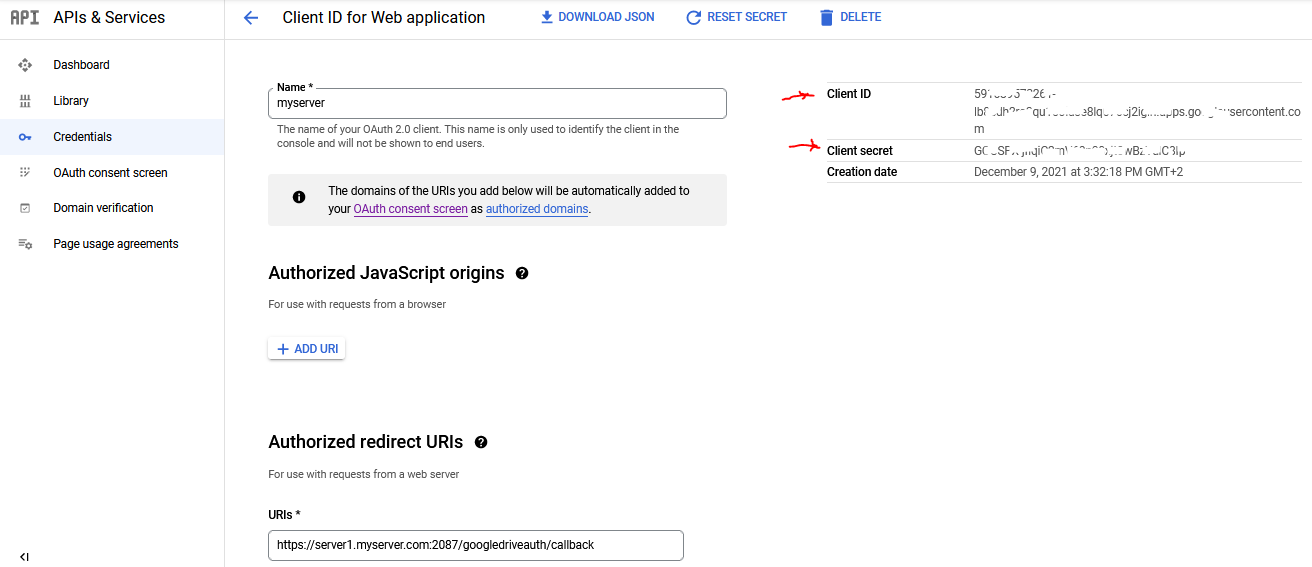
خطوة رقم 3 انشاء اعتماد Create Credential واختيار OAuth client ID فقط
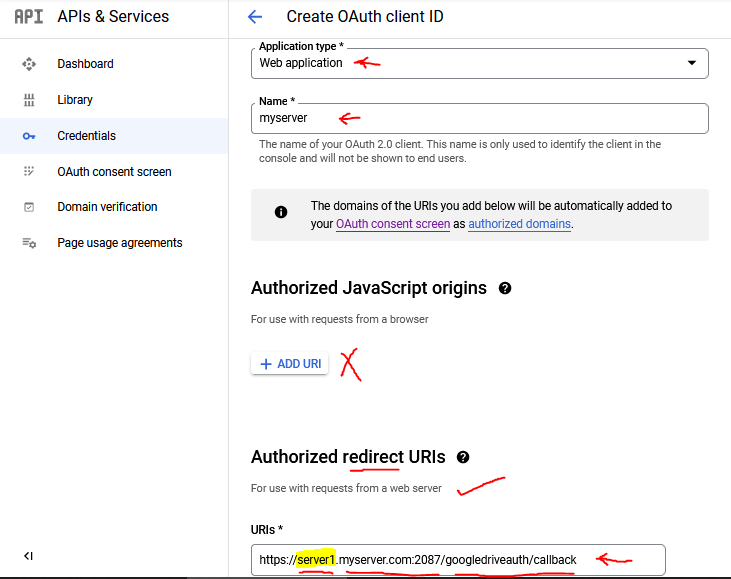
ووضع الرابط التالى بنفس الشكل فى الصورة الاخيرة مع تغيير اسم الاحمر بالخاص بك
كود:https://server1.myserver.com:2087/googledriveauth/callback
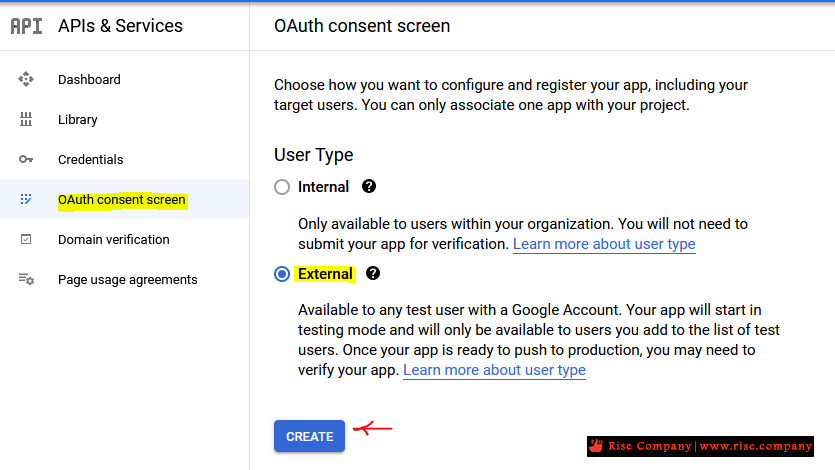
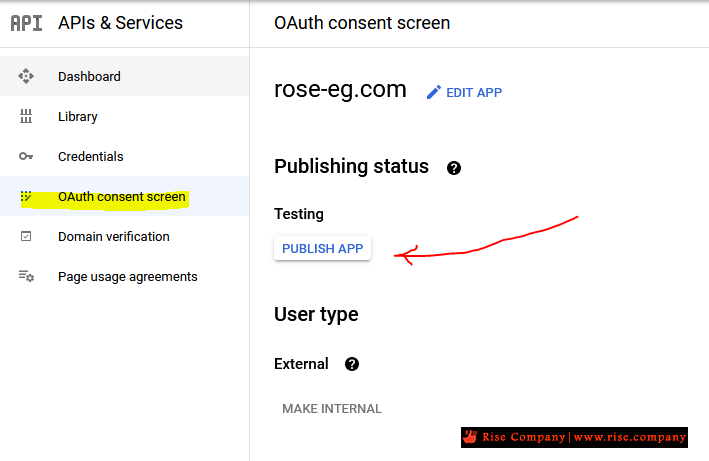
خطوة رقم 4 اذهب الى OAuth consent screen
ثم فقط اضغط على كلمة publish للمشروع و الافتراضى هيكون external
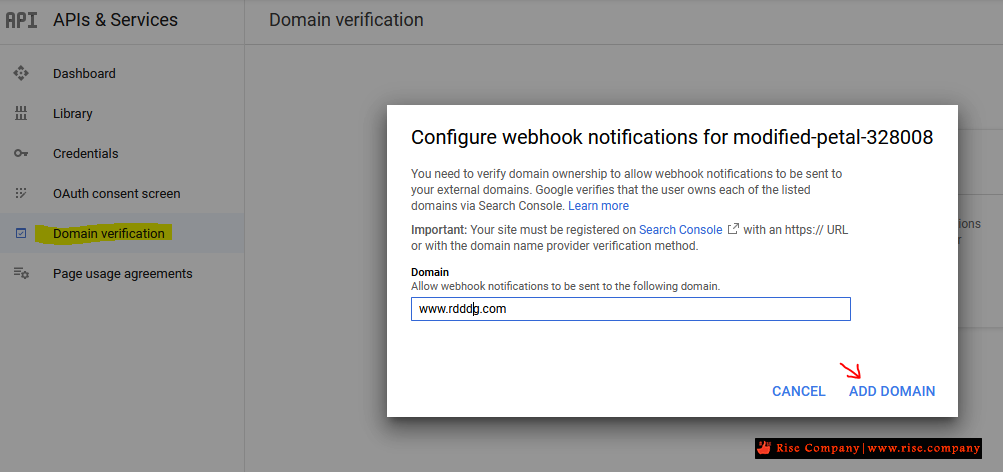
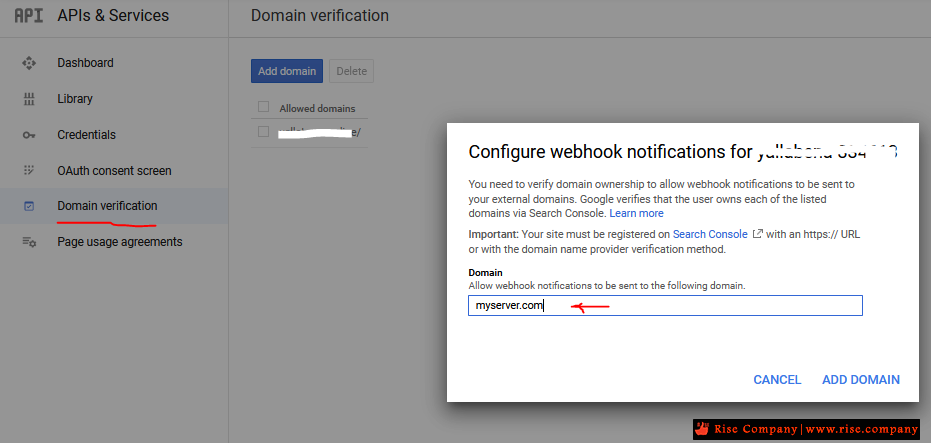
خطوة رقم 5 ادخل الدومين الخاص بالسيرفر للتحقق منه فى Domain Verification
----------------------------------------------------------
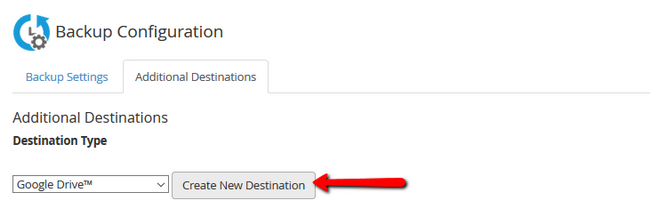
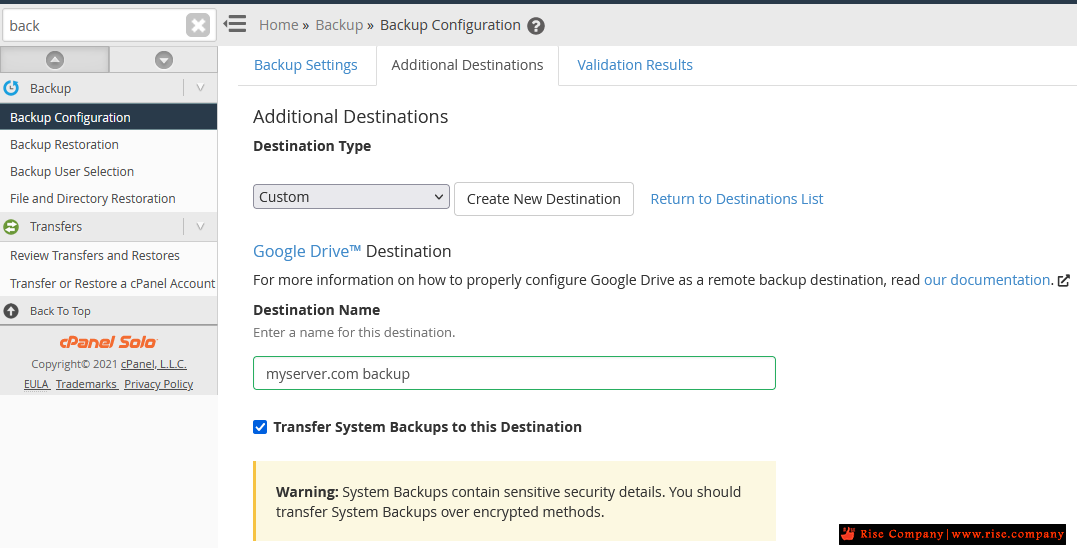
خطوات لتفعيل الباك اب داخل whm فى Additional Destinations
----------------------------------------------------------
ادخل البيانات مثل فى الصورة اسم الباك اب / مجلد الباك اب
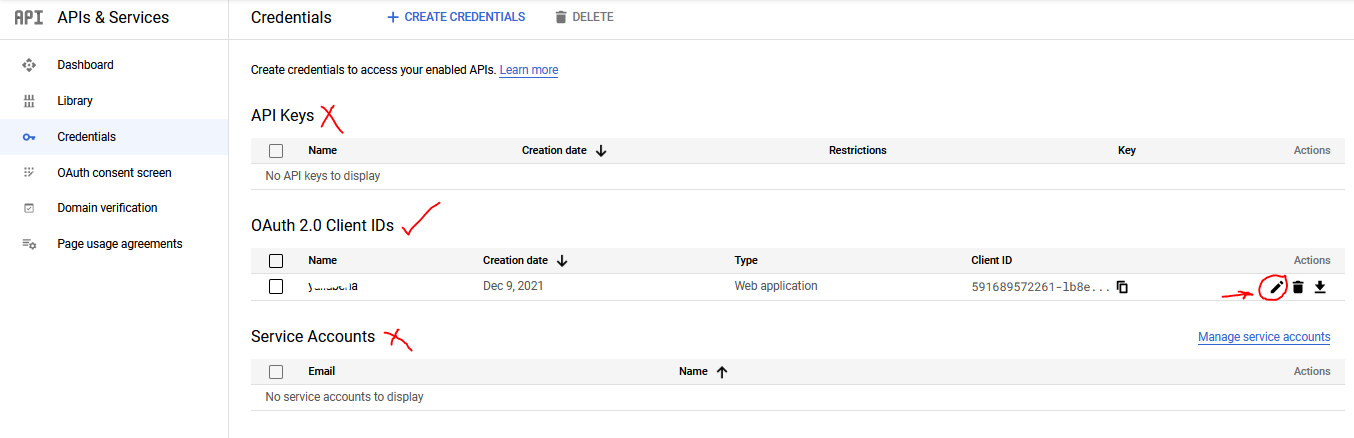
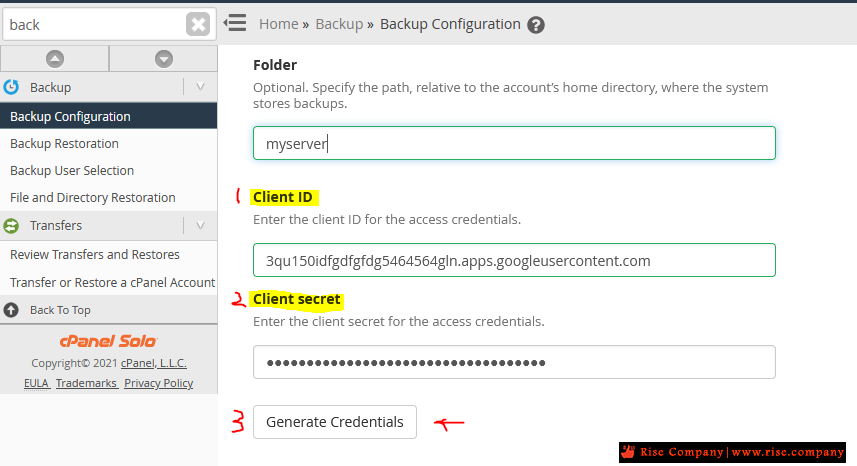
فى الاعلى تم ادخال client ID و client secret الذى تم عمله على موقع جوجل فى الاعلى
ثم اضغط Generate Credntials اذا لم يعمل اعمل حفظ واخرج و ادخل مرة اخرى وهيعمل معك
صورة من المفاتيح التى تم عملها فى الاعلى تم وضعها هنا
الان انت مؤمن بشكل كامل
حيث ان الباك اب ياخذ local وياخذ على google drive
والباك اب نوعين
الاول : هو باك اب لاعدادات سيستم السيرفر كامل System
الاخير : هو باك اب لجميع حسابات المواقع لديك Accounts
شاهد ايضا :ملحوظة :
عند كتابة host بيكون به الازرق : server1.myserver.com
وعند اختيار Create OAuth اختر external
اخذ باك للسى بانل على جوجل درايف cPanel Backup to Google Drive
السي بانال WHM/cPanel اضافة باك اب خارجي SFTP / ftp Backup Space
المرجع:
https://docs.cpanel.net/knowledge-ba...l-destination/
https://www.fastcomet.com/tutorials/...o-google-drive
+ إنشاء موضوع جديد
النتائج 1 إلى 2 من 2
-
30-10-2020, 00:18 #1Status
- Offline

- تاريخ التسجيل
- Apr 2014
- الدولة
- Egypt
- المشاركات
- 4,640
 Engineering and Technology
- معدل تقييم المستوى
- 10
 السي بانال CPanel اخذ باك اب كامل خارج السيرفر whm backup to Google Drive
------------------------------------------------------------------------
السي بانال CPanel اخذ باك اب كامل خارج السيرفر whm backup to Google Drive
------------------------------------------------------------------------
شركة رايز للهندسة و التكنولوجيا Rise Company for Engineering & Technology
------------------------------------------------------------------------
Web Hosting | Web Designing | E-Marketing
رقم # 1 فى خدمات الشركات Business Services
استضافة مواقع Web Hosting - عمل ايميل شركة Business Emails
تصميم موقع شركة Web Design - تسويق الكترونى على جوجل Google Adwords
www.rise.company | www.rise.company/emails
ملحوظة : جميع خدماتنا مخصصة للشركات فقط وغير متاحة للافراد
وليس لنا اى منتجات او صيانة نهائيا! يرجى الانتباه الى ذلك.
-
09-12-2021, 16:13 #2Status
- Offline
- تاريخ التسجيل
- Apr 2014
- الدولة
- Egypt
- المشاركات
- 4,640
Engineering and Technology
- معدل تقييم المستوى
- 10
رد: السي بانال CPanel اخذ باك اب كامل خارج السيرفر whm backup to Google Drive
----------------------------------------------------------
شرح قديم الخطوات بالتفصيل
----------------------------------------------------------
----------------------------------------------------------
خطوات تفعيل Google Drive API
----------------------------------------------------------
1) Visit Google Cloud Platform
2) Click OAuth consent screen from the left-side navigation screen.
3) Enter the domain name in the Authorized domains section and hit the ENTER key.
4) Click Save
5) Click Library from the left-hand side
6) Find the Google Drive API and click on it
7) Click on Create Project (or ENABLE if you already have one), Click Manage if already enabled.
8) Click Credentials in the left-side navigation bar
9) Click Create credentials drop-down button at the top and select OAuth client ID
10) Select Web Application
11) Enter a name (WHM to Google)
12) In the Authorized redirect URIs text box, enter the https://server.yourcompany.com:2087/googledriveauth/callback link
13) Click Create. The interface will display your new client ID and client secret
14) Click Done
--------------------------------------------------
15) Log in to WHM as a root-enabled user
16) Navigate to WHM => Backup => Backup Configuration) and select the Additional Destinations tab
17) Select Google Drive from the Destination Type menu
18) Click Create new destination
19) Enter a destination name of your choice
20) Enter your client ID and client secret
21) Click Generate Credentials to generate the credentials file. A new tab will open to allow you to authorize access to your Google Drive data
NOTE:
Step 21 will fail if you DO NOT COMPLETE Step 2
22) Enter the desired timeout
23) Click Save and Validate
Create a Google project and configure the Google Drive API
Configuring a channel for your backups to be pushed on to your Google Drive will require a properly set project and API credentials. All of this can be done very quickly via the Google's Developers Console which you can open via your google account. To create a new project, click on the My Project/Select a Project button at the top of the page.
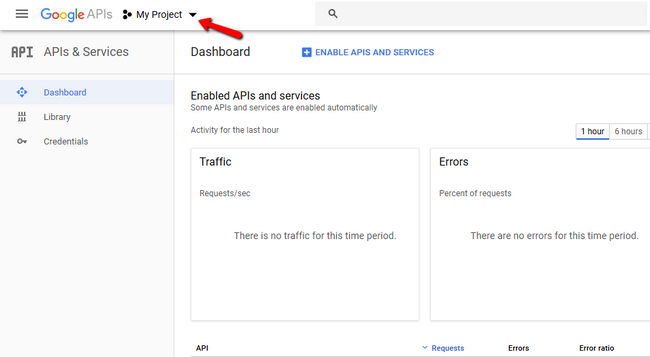
If this is the first time you are opening the console, you will not have an active project, so let's create one. Click on the New Project button.
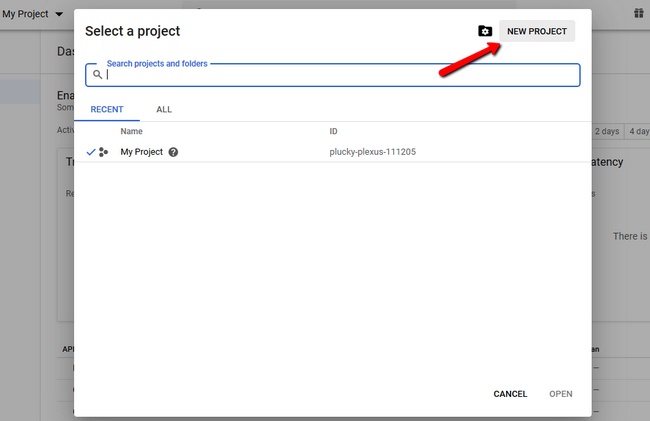
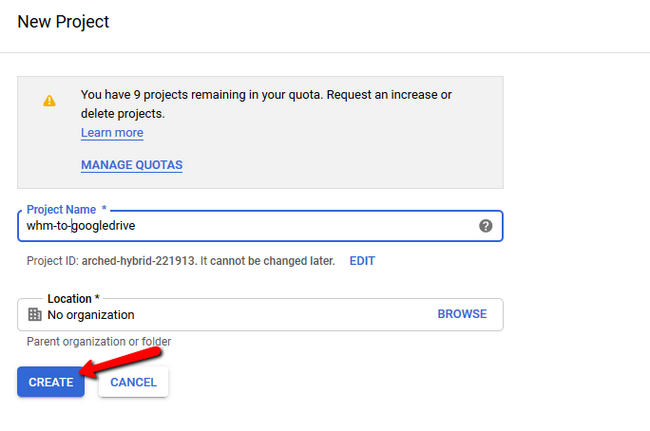
Name your project so you can recognize it later and click on the Create button.
Now, you will have to enable the Google Drive API, so click either on its icon if it is present or hit the Enable APIs and Services button.
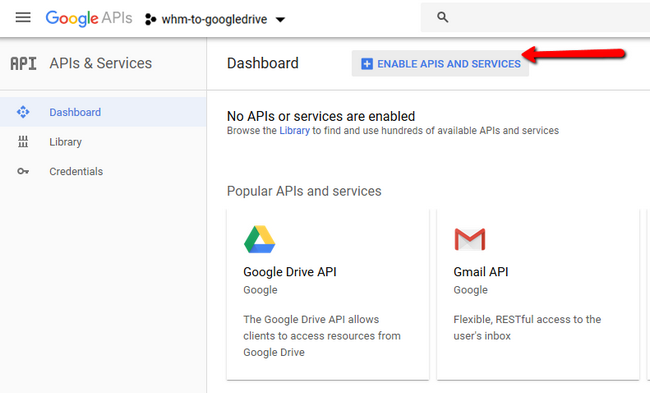
Select the Enable option to continue.
Since later we will need 2 different strings of symbols that will act as our public/private keys,
we have to add credentials for the API so click on the Create Credentials button.
Here you will see a plethora of options for each field. The ones that you will need are the following:
- Which API are you using?
Google Drive API - Where will you be calling the API from?
Web server (e.g., node.js, Tomcat) - What data will you be accessing?
User data
When you are done, click on the "What credentials do I need?" option to continue.

As part 2 of this setup, you will be prompted to create an OAuth 2.0 client ID.
Add a name which will be easy to remember and be descriptive of the use of credentials and in the Authorized redirect URLs
add https://server.yourcompany.com:2087/...eauth/callback
where hostname will be substituted with the actual hostname of your server.
Note that using your server's IP here will not be possible.
Click on Create OAuth client ID, and after that, you can pretty much leave part 3 of the setup as it is. On part 4 you will get the Client ID and rest of credentials for the API. Make sure to download the .JSON file as you will need it for the "private key" which in this case is called client_secret. Click Doneto finalize the setup.
Open the downloaded file with a text editor and copy the client _secret string. You will need this for the configuration of your custom google drive destination in the second half of this tutorial.

----------------------------------------------------------------------------------
Google Drive as an Additional Destination in WHM's backup configuration
----------------------------------------------------------------------------------
To actually make the backup be pushed each time to your Google Drive or as referred in the past - to make a Google Drive transport, you will have to navigate to WHM → Backup → Backup Configuration and switch the to the Additional Destinations tab. Then select Google Drive as a Destination Type.
Now if you wish to specify in what orders should the backups be kept, you can do so in the Folder field. The Client ID field should be populated with the Client ID which you got from the first part of this tutorial. The same goes for the Client Secret which you got from the .JSON file.
Once you have copied both API credentials in the correct fields, click on the Generate Credentials button. This is a bit like a reverse of what we just did in the Google Developers console, and now you will be prompted to Authorize Access.

We recommend you keep the default Timeout value and complete the setup by clicking on Save and Validate Destination. If you click on only Save Destination, a validation can be performed afterward at any time, but that validation is required in order for the backups to actually arrive at your Google Drive. You wouldn't want to do all of this only not to have your backups properly pushed, so validation is a must.
------------------------------------------------------------------------
شركة رايز للهندسة و التكنولوجيا Rise Company for Engineering & Technology
------------------------------------------------------------------------
Web Hosting | Web Designing | E-Marketing
رقم # 1 فى خدمات الشركات Business Services
استضافة مواقع Web Hosting - عمل ايميل شركة Business Emails
تصميم موقع شركة Web Design - تسويق الكترونى على جوجل Google Adwords
www.rise.company | www.rise.company/emails
ملحوظة : جميع خدماتنا مخصصة للشركات فقط وغير متاحة للافراد
وليس لنا اى منتجات او صيانة نهائيا! يرجى الانتباه الى ذلك.


 رد مع اقتباس
المواضيع المتشابهه
-
السي بانال CPanel اخذ باك اب كامل خارج السيرفر whm backup to Amazon S3
بواسطة Rise Company في المنتدى رايز للاستضافة Rise Hostمشاركات: 0آخر مشاركة: 29-10-2020, 15:46 -
السي بانال CPanel مميزات الجيت باك اب المتطور Backup / Restore with JetBackup
بواسطة Rise Company في المنتدى رايز للاستضافة Rise Hostمشاركات: 0آخر مشاركة: 29-10-2020, 14:47 -
اخذ باك للسى بانل على جوجل درايف cPanel Backup to Google Drive
بواسطة Rise Company في المنتدى رايز للاستضافة Rise Hostمشاركات: 0آخر مشاركة: 08-12-2018, 02:46 -
شرح عمل باك اب تلقائى على السيرفر Automatically backup all cPanel/WHM Accounts
بواسطة Rise Company في المنتدى رايز للاستضافة Rise Hostمشاركات: 0آخر مشاركة: 08-12-2018, 02:32 -
اخذ باك اب شامل whm accounts backup للسيرفر على Google Drive
بواسطة Rise Company في المنتدى رايز للاستضافة Rise Hostمشاركات: 0آخر مشاركة: 08-12-2018, 02:27

المفضلات