

شرح عمل باك اب تلقائى على السيرفر Automatically backup all cPanel/WHM Accounts
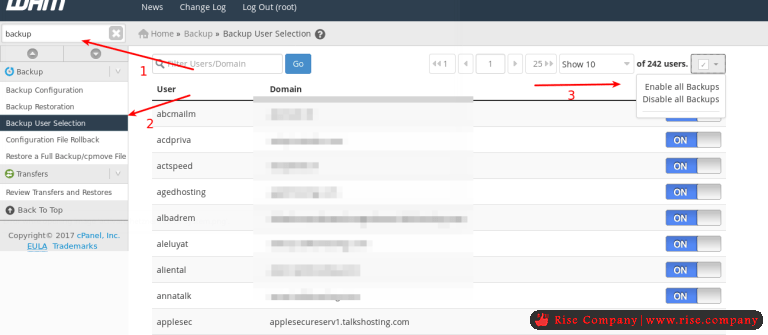
Step 1: Select the Accounts to Backup!
WHM let you select which accounts you need to include in the automatic backup process, please see in the image below that how we can do this:
- Search for “backup” in the search box.
- Than select “Backup User Selection” from the list.
- Now on the third arrow, if you want to enable backups for all cPanel accounts you can click “Enable All Backups”.
However if you are not interested to enable backup for all accounts, you can turn them “on” or “off” for each account. Once you are done with user selection, we can configure the backup settings for automatic backups to a remote server.
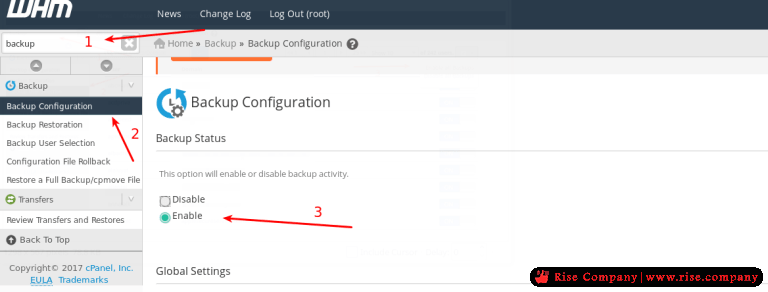
Step 2: Enable Backups!
Next step is to enable your backups settings, so that backups can be created on daily, weekly or monthly bases.
- Search for “backup” in the search box.
- Than select “Backup Configuration” from the list.
- Now enable the backups as they are enabled in the image above. By default they are disabled so you must enable for backup function to work.
Step 3: Select Backup Type!
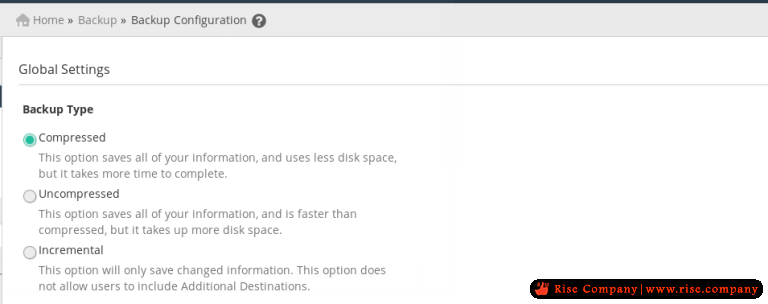
- As you can see you have 3 options available, and I’ve selected the first option which is “Compressed”. Now it depends on your setup, if you have less storage space for backups you need to select compressed backup type, however it will put some load on your server for compression to take place.
- If you select uncompressed, it will save all files to the remote server uncompressed, so there is no cpu overheads on the server but than you require more space on the storage server.
- The third option is very new in WHM and which is incremental, you should not select it because with this option you can not store backups to remote locations. This option only works for backups in local directory.
Now it depends on your usecase that which option works best for you.
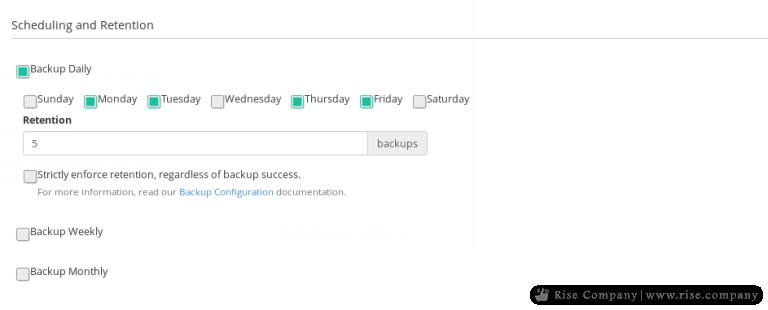
Step 4: Schedule Backup!
Now we need to select that how often you need to backup your accounts, there are three possible options.
- Monthly.
- Weekly.
- Daily.
My current settings looks like:
Now it is totally upto your requirments that how often you are interested to backup your accounts.
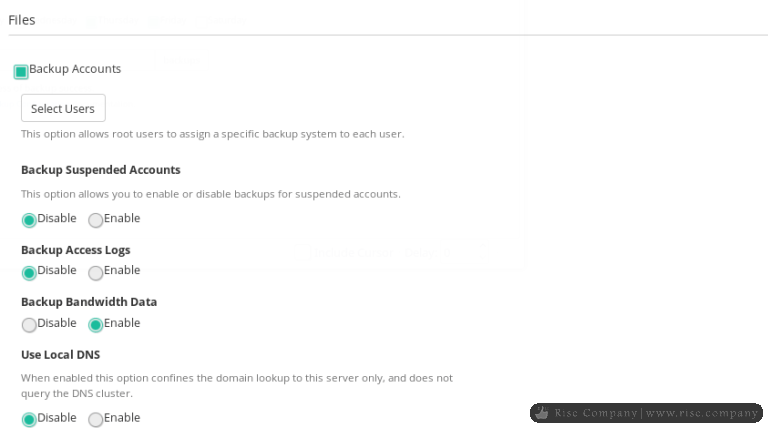
Step 5: WHM Backup File Related Settings!
These are some miscilinious settings weather you are interested in enabling backups for suspended accounts or you need to store backups for access logs or not, you can leave these settings as they are, my settings looks like:
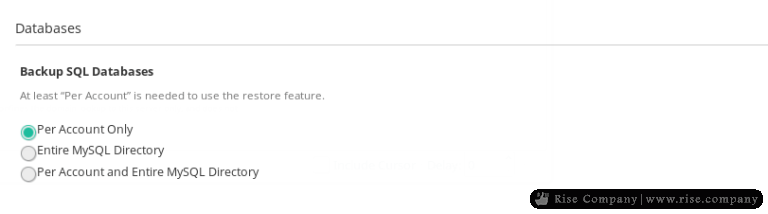
Step 6: Database backup!
Well this option is an important one, database backups are important to restore the WHM account restore feature.
You must atleast select “Per Account Only” option , this way you can use the backup file directly to restore account from WHM. All you will need to do is upload the backup file in “/home” directory of your cPanel/WHM server and than restore the account from WHM, we will discuss on how to do that in another article.
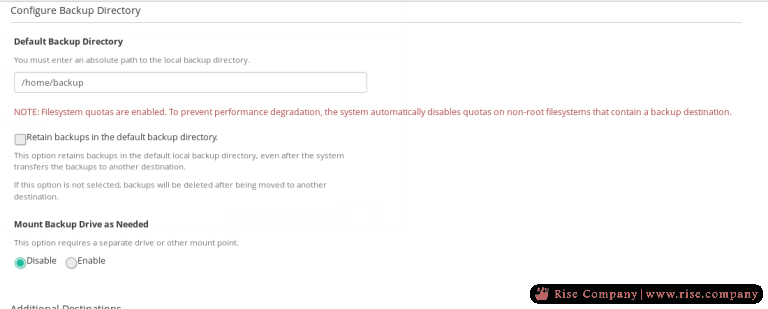
Step 7: Configure Local Backup Directory!
Before backups are sent to a remote location, they need to be stored at local directory first. You need to specify where WHM should store backups locally, you need to be carefull that this directory should have enough space to accomodate backups.
As you can see that I’ve unchecked the “Retain backups in the default backup directory“, because this will save space on your WHM server, it means once the backups are transferred to a remote location, they will be deleted from your WHM server. But you can always turn it on if you need.
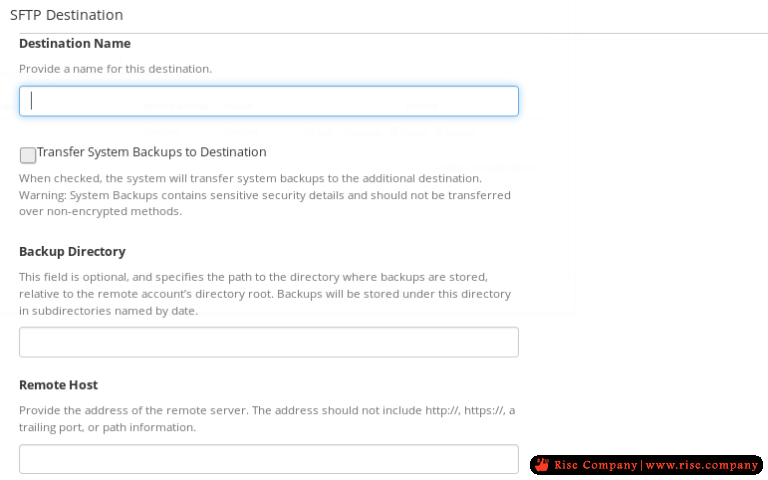
Step 8: Create Backup Destination
Now this is the step where we need to define a remote server which will house our backups. For that you are going to need a server, with SSH or FTP access. I am going to demonstrate that how you can do this with ssh access, same will apply to ftp server as well.
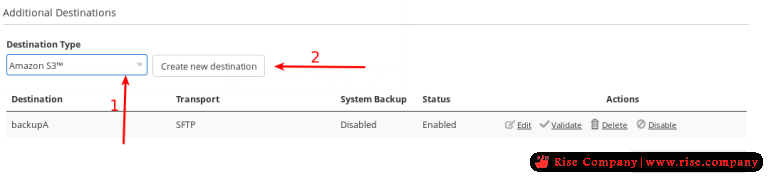
- From drop down select “SFTP”.
- Than click “Create new destination”.
Following will than appean:
Destination Name: Give any friendly name to your destination.
Backup Directory: Remote backup directory where WHM will send the backups, i.e. /root/backups.
Remote Host: IP Address of the server.
Port: 22
Authentication Type: Password Authentication.
Remote Password: SSH Password of your server.
After filling all these details click “Save and Validate Destination”. It will save the details as well verify the details that you have provided.
Step 9: Finalize the Backup Configuration
Once all the above mentioned steps are completed you can click “Save Configurations” at the end of the main backup configuration window. And we are done, your backups will now be sent to the remote server automatically depending on what scheduled you have choose
+ إنشاء موضوع جديد
النتائج 1 إلى 1 من 1
-
08-12-2018, 02:32 #1Status
- Offline

- تاريخ التسجيل
- Apr 2014
- الدولة
- Egypt
- المشاركات
- 4,624
 Engineering and Technology
- معدل تقييم المستوى
- 10
 شرح عمل باك اب تلقائى على السيرفر Automatically backup all cPanel/WHM Accounts
------------------------------------------------------------------------
شرح عمل باك اب تلقائى على السيرفر Automatically backup all cPanel/WHM Accounts
------------------------------------------------------------------------
شركة رايز للهندسة و التكنولوجيا Rise Company for Engineering & Technology
------------------------------------------------------------------------
Web Hosting | Web Designing | E-Marketing
رقم # 1 فى خدمات الشركات Business Services
استضافة مواقع Web Hosting - عمل ايميل شركة Business Emails
تصميم موقع شركة Web Design - تسويق الكترونى على جوجل Google Adwords
www.rise.company | www.rise.company/emails
ملحوظة : جميع خدماتنا مخصصة للشركات فقط وغير متاحة للافراد
وليس لنا اى منتجات او صيانة نهائيا! يرجى الانتباه الى ذلك.

 رد مع اقتباس
المواضيع المتشابهه
-
اخذ باك اب شامل whm accounts backup للسيرفر على Google Drive
بواسطة Rise Company في المنتدى رايز للاستضافة Rise Hostمشاركات: 0آخر مشاركة: 08-12-2018, 02:27 -
ضبط اعدادات السيرفر لاول مره بعد تركيب whm / cpanel
بواسطة Rise Company في المنتدى رايز للاستضافة Rise Hostمشاركات: 0آخر مشاركة: 29-11-2018, 20:04 -
عمل backup/Restore لجميع حسابات الايميلات e-mail Accounts على Cpanel
بواسطة Rise Company في المنتدى رايز للاستضافة Rise Hostمشاركات: 0آخر مشاركة: 09-05-2018, 14:09 -
شرح عمل cc تلقائى للايميلات فى الاوت لوك automatically add BCC and CC in Outlook
بواسطة Rise Company في المنتدى قسم الايميلات Emailsمشاركات: 0آخر مشاركة: 10-02-2018, 22:58 -
شرح :: اعداد السيرفر لأخذ نسخ احتياطي Backup
بواسطة Eng Amr Adel في المنتدى رايز للاستضافة Rise Hostمشاركات: 0آخر مشاركة: 02-10-2012, 23:31

المفضلات