

السي بانال CPanel تثبيت install ImageMagick
Install Imagick on cPanel/WHM Server
حل مشكلة module 'imagick' already loaded in unknown on line 0
--------------------------------------
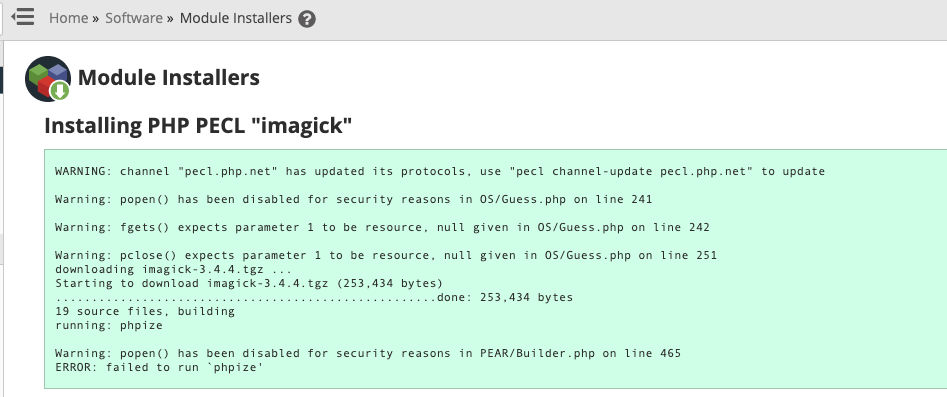
هذه الخطوة همة جدا جدا
بدونها لن يثبت imagick من الاساس !!
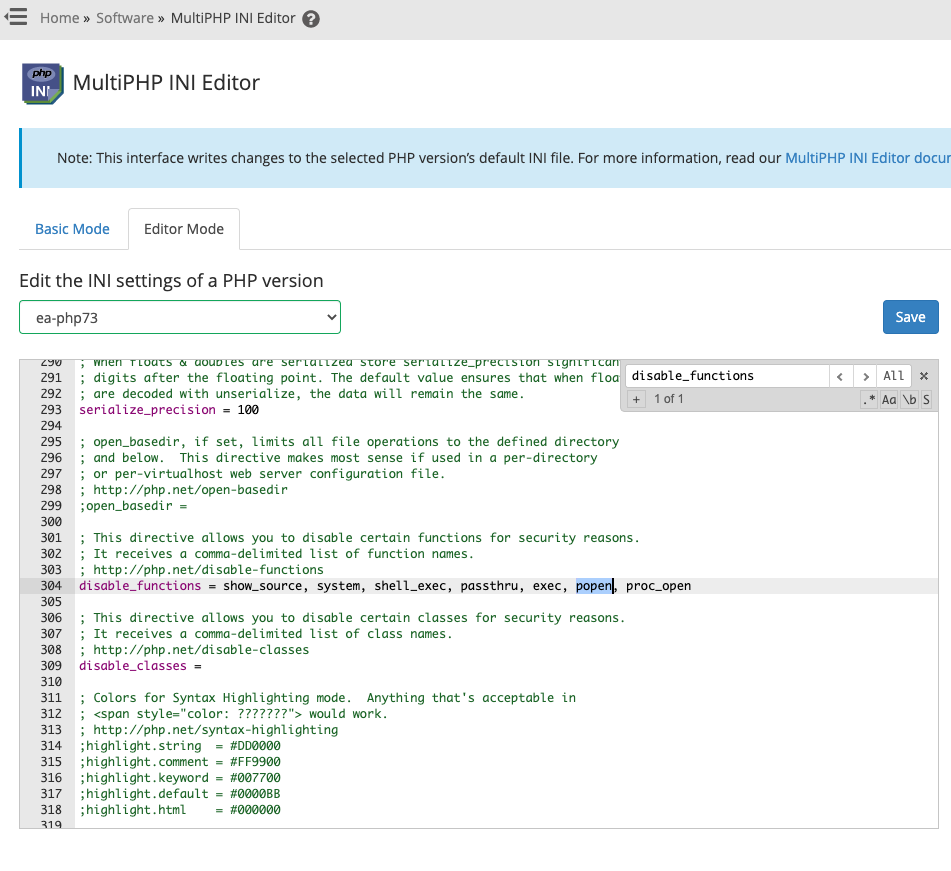
يجب ازالة دالة popen, proc_open من disable_functions
والافضل ازالة سطر disable مؤقتا حتى يتم التثبيت ثم ارجاعه مرة اخرى.
--------------------------------------
imagick – popen error remove “popen” from disable_functions
Let see how to install ImageMagick on CentOS 7 Cpanel server easily.
1st you have to remove “popen” from disable_functions in php.ini,
otherwise, you will get this error
disable_functions let’s get started with imagick
You can use WHM to do the installation with the following steps:
1. Login to WHM as the root user
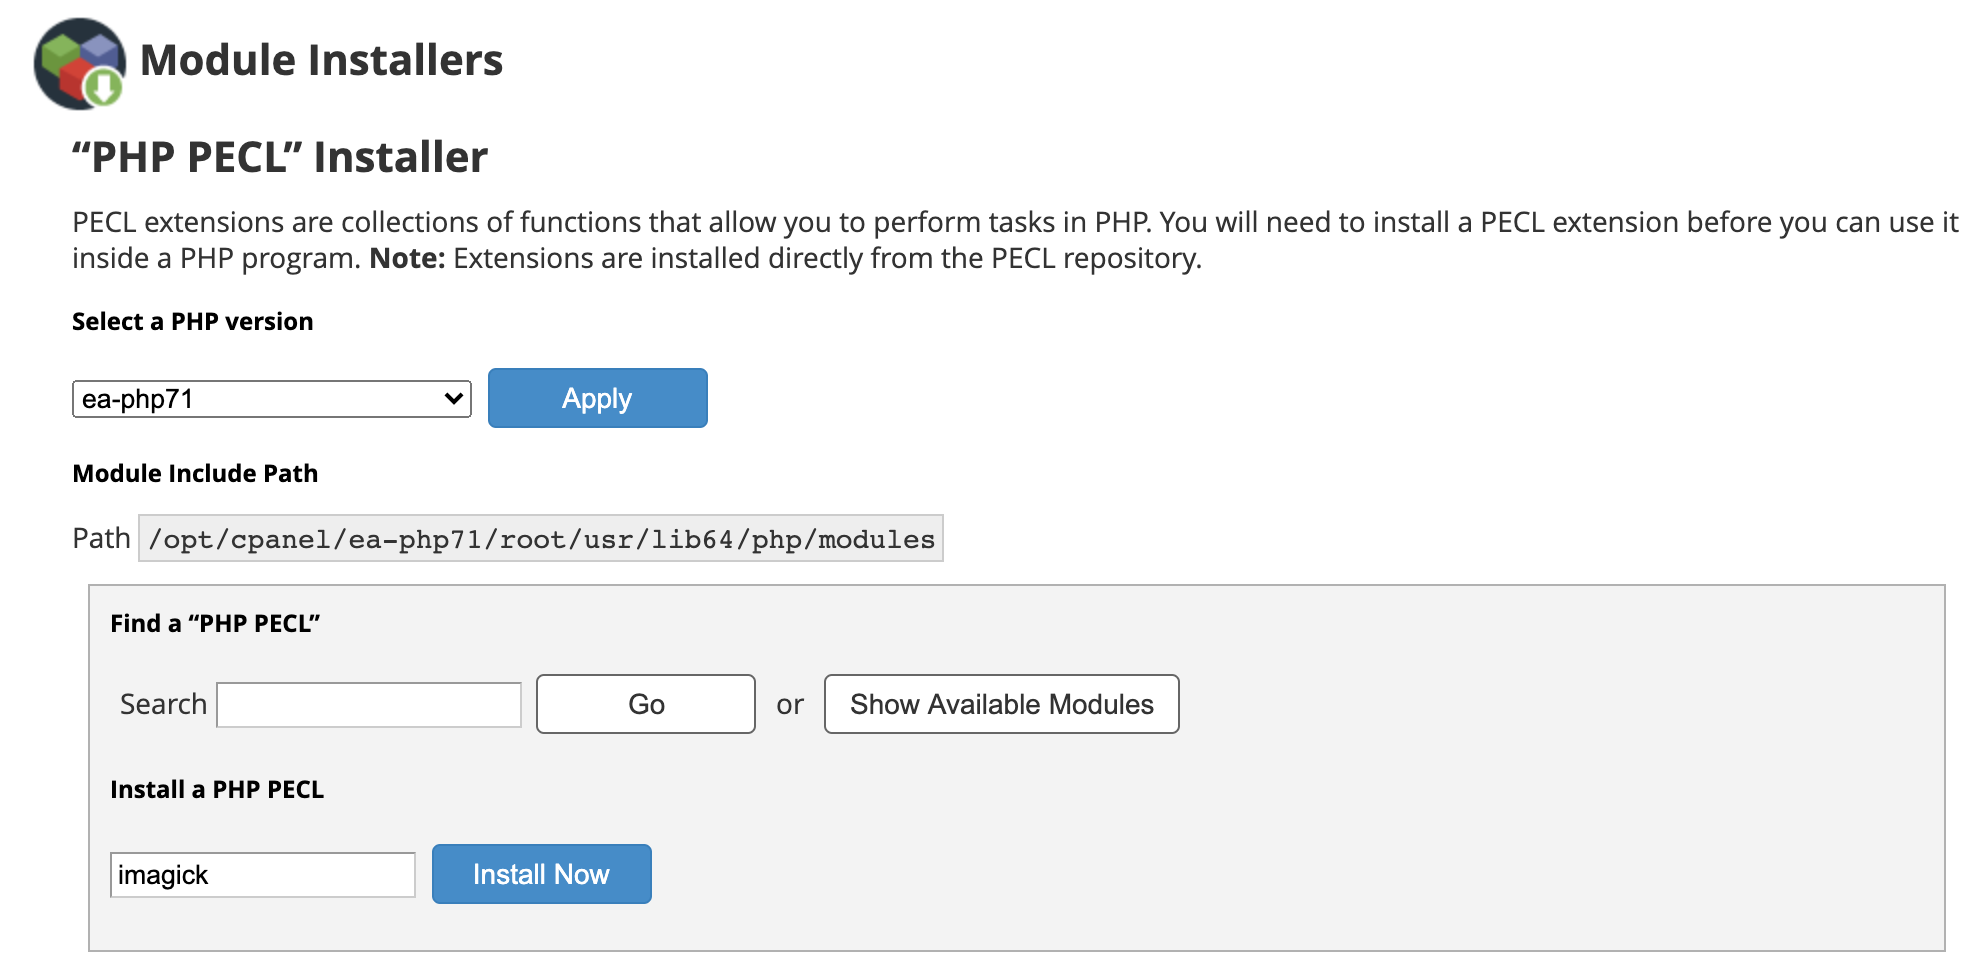
2. Navigate to: Home »Software »Module Installers
3. Click on the Manage link to the right of “PHP Pecl”
4. Select the version of PHP from the drop-down and click Apply
5. Under “Install a PHP Pecl” enter “imagick” (without the quotes)
6. Click “Install Now”
imagick-install end up with
Run the following command:
كود:[root@ds77 ~]# echo 'extension=imagick.so' > /opt/cpanel/ea-php73/root/etc/php.d/imagick.ini
Next Restart apache and php-fpm service
now you are done
--------------------------------------------------------------------
You can also install the extension from WHM. Navigate to Home - Software - Module Installers, then click on the Manage button next to PHP Pecl.
In the next screen, select the required PHP version, then click Apply.
You can now enter “imagick” in the Install a PHP Pecl field, and click the Install Now button.
The extension should be compiled quickly, look at the bottom of the log on the screen for the confirmation that it was built successfully.
1) On WHM/cpanel
Home »Software »Module Installers
2) PHP Pecl
3) i Selected PHP version (7.3) and apply
4) On the “install a PHP Pecl” box type “imagick” without the quotes and click install now.
-------------------------------------------------------------------------------
للتاكد من ان التثبيت يعمل بشكل سليم ام لا
قم برفع ملف test.php المرفق فى المرفقات
To test if the extension works, you can run this PHP code:
كود:<?php $image = new Imagick(); $image->newImage(1, 1, new ImagickPixel('#ffffff')); $image->setImageFormat('png'); $pngData = $image->getImagesBlob(); echo strpos($pngData, "\x89PNG\r\n\x1a\n") === 0 ? 'Ok' : 'Failed';
وشوف النتيجة الى هتظهر ok ام لا
اذا ظهر خطا 404 وقف .htaccess
اذا ظهر صفحة بيضاء اعمل ريستارت php + انتظر 5 دقائق + جرب حساب اخر
لابد وهيظهر لك انه يعمل
المرجع:
https://mlocati.github.io/articles/p...s-imagick.html
-------------------------------------------------------------------------------
اذا ظهر خطا فى imagic هتجد ان المشكلة ان البرمجة غير متوافقه مع اصدار php الحديث ويجب النزول الى اصدار php 5.6 حتى يعمل بدون مشاكل
المرجع:
https://bigstep.com/blog/how-to-inst...emagick-in-whm
https://www.supportclients.com/image...cpanel-server/
+ إنشاء موضوع جديد
النتائج 1 إلى 5 من 5
-
09-02-2021, 04:26 #1Status
- Offline

- تاريخ التسجيل
- Apr 2014
- الدولة
- Egypt
- المشاركات
- 4,634
 Engineering and Technology
- معدل تقييم المستوى
- 10
 السي بانال CPanel تثبيت install ImageMagick
------------------------------------------------------------------------
السي بانال CPanel تثبيت install ImageMagick
------------------------------------------------------------------------
شركة رايز للهندسة و التكنولوجيا Rise Company for Engineering & Technology
------------------------------------------------------------------------
Web Hosting | Web Designing | E-Marketing
رقم # 1 فى خدمات الشركات Business Services
استضافة مواقع Web Hosting - عمل ايميل شركة Business Emails
تصميم موقع شركة Web Design - تسويق الكترونى على جوجل Google Adwords
www.rise.company | www.rise.company/emails
ملحوظة : جميع خدماتنا مخصصة للشركات فقط وغير متاحة للافراد
وليس لنا اى منتجات او صيانة نهائيا! يرجى الانتباه الى ذلك.
-
10-02-2021, 12:54 #2Status
- Offline
- تاريخ التسجيل
- Apr 2014
- الدولة
- Egypt
- المشاركات
- 4,634
Engineering and Technology
- معدل تقييم المستوى
- 10
رد: السي بانال CPanel تثبيت install ImageMagick
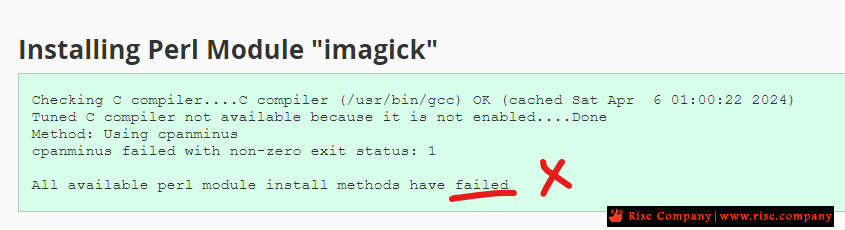
قبل ذلك يجب عمل
Install a Perl Module Image::Magick------------------------------------------------------------------------
شركة رايز للهندسة و التكنولوجيا Rise Company for Engineering & Technology
------------------------------------------------------------------------
Web Hosting | Web Designing | E-Marketing
رقم # 1 فى خدمات الشركات Business Services
استضافة مواقع Web Hosting - عمل ايميل شركة Business Emails
تصميم موقع شركة Web Design - تسويق الكترونى على جوجل Google Adwords
www.rise.company | www.rise.company/emails
ملحوظة : جميع خدماتنا مخصصة للشركات فقط وغير متاحة للافراد
وليس لنا اى منتجات او صيانة نهائيا! يرجى الانتباه الى ذلك.
-
10-02-2021, 14:30 #3Status
- Offline
- تاريخ التسجيل
- Apr 2014
- الدولة
- Egypt
- المشاركات
- 4,634
Engineering and Technology
- معدل تقييم المستوى
- 10
رد: السي بانال CPanel تثبيت install ImageMagick
هذه الخطوات لن تفيد , ولكن للافادة فقط
للتاكد جرب كود فى ملف test فى الرد التالى
---------------------------------------------------------
An I figured it out my self. Yayyyyy!!
I found that somehow there were two ImageMagick's directories on my server. Not sure how!
I found two separate directories :
/usr/include/ImageMagick-7
/usr/include/ImageMagick-6
Anyways, I wanted to try re-install ImageMagick and I found the install version using :
which gave me following result:كود:rpm -qa |grep ImageMagick
ImageMagick-6.9.10.68-3.el7.x86_64
ImageMagick-devel-6.9.10.68-3.el7.x86_64
I remove it using :
it removed the dependencies as well.كود:yum remove ImageMagick-6.9.10.68-3.el7.x86_64
Then I installed it again using Yum:
It should installed ImageMagick again.كود:yum install ImageMagick ImageMagick-devel ImageMagick-perl php-devel gcc
After that tried enabling the php image magick extension on php 7.4 again (manually and using cPanel) but unfortunately It failed again.
Investigating it further I found that in the make command it was referencing the path /usr/include/ImageMagick-7 I guess it was used as well.
I though why not installed the latest version of Imagick, so I followed the installation below :
كود:# wget https://www.imagemagick.org/download/ImageMagick.tar.gz # tar xvzf ImageMagick.tar.gz # cd ImageMagick* # ./configure # make # make install
# magick -version
Version: ImageMagick 7.0.8-35 Q16 x86_64 2019-03-27 ImageMagick
Copyright: © 1999-2019 ImageMagick Studio LLC
License: ImageMagick
Features: Cipher DPC HDRI OpenMP
Delegates (built-in): bzlib fontconfig freetype jng jpeg lzma png tiff x xml zlib
and I guess it installed ImageMagick-7 again.
After this installing the php extension from cpanel (module installer > install pecl) worked charm. Finally got it working!!!!!!!!!
Not sure how I came from reinstalling 6 and installing 7. That made no sense to me after giving it a thought but I guess I was frustrated spending long hours trying to fix it, so wanted to try everything.
المرجع:
https://forums.cpanel.net/threads/is...hp-7-4.681589/
------------------------------------------------------------------------
شركة رايز للهندسة و التكنولوجيا Rise Company for Engineering & Technology
------------------------------------------------------------------------
Web Hosting | Web Designing | E-Marketing
رقم # 1 فى خدمات الشركات Business Services
استضافة مواقع Web Hosting - عمل ايميل شركة Business Emails
تصميم موقع شركة Web Design - تسويق الكترونى على جوجل Google Adwords
www.rise.company | www.rise.company/emails
ملحوظة : جميع خدماتنا مخصصة للشركات فقط وغير متاحة للافراد
وليس لنا اى منتجات او صيانة نهائيا! يرجى الانتباه الى ذلك.
-
10-02-2021, 19:31 #4Status
- Offline
- تاريخ التسجيل
- Apr 2014
- الدولة
- Egypt
- المشاركات
- 4,634
Engineering and Technology
- معدل تقييم المستوى
- 10
رد: السي بانال CPanel تثبيت install ImageMagick
للتاكد من ان التثبيت يعمل بشكل سليم ام لا
قم برفع ملف test.php المرفق فى المرفقات
To test if the extension works, you can run this PHP code:
كود:<?php $image = new Imagick(); $image->newImage(1, 1, new ImagickPixel('#ffffff')); $image->setImageFormat('png'); $pngData = $image->getImagesBlob(); echo strpos($pngData, "\x89PNG\r\n\x1a\n") === 0 ? 'Ok' : 'Failed';
وشوف النتيجة الى هتظهر ok ام لا
اذا ظهر خطا 404 وقف .htaccess
المرجع:
https://mlocati.github.io/articles/p...s-imagick.html
------------------------------------------------------------------------
شركة رايز للهندسة و التكنولوجيا Rise Company for Engineering & Technology
------------------------------------------------------------------------
Web Hosting | Web Designing | E-Marketing
رقم # 1 فى خدمات الشركات Business Services
استضافة مواقع Web Hosting - عمل ايميل شركة Business Emails
تصميم موقع شركة Web Design - تسويق الكترونى على جوجل Google Adwords
www.rise.company | www.rise.company/emails
ملحوظة : جميع خدماتنا مخصصة للشركات فقط وغير متاحة للافراد
وليس لنا اى منتجات او صيانة نهائيا! يرجى الانتباه الى ذلك.
-
10-02-2021, 19:51 #5Status
- Offline
- تاريخ التسجيل
- Apr 2014
- الدولة
- Egypt
- المشاركات
- 4,634
Engineering and Technology
- معدل تقييم المستوى
- 10
رد: السي بانال CPanel تثبيت install ImageMagick
------------------------------------------------------------------------
شركة رايز للهندسة و التكنولوجيا Rise Company for Engineering & Technology
------------------------------------------------------------------------
Web Hosting | Web Designing | E-Marketing
رقم # 1 فى خدمات الشركات Business Services
استضافة مواقع Web Hosting - عمل ايميل شركة Business Emails
تصميم موقع شركة Web Design - تسويق الكترونى على جوجل Google Adwords
www.rise.company | www.rise.company/emails
ملحوظة : جميع خدماتنا مخصصة للشركات فقط وغير متاحة للافراد
وليس لنا اى منتجات او صيانة نهائيا! يرجى الانتباه الى ذلك.


 رد مع اقتباس
المواضيع المتشابهه
-
السي بانال CPanel حل مشكلة امتلاء مساحة WHM Swap Used 100%
بواسطة Rise Company في المنتدى رايز للاستضافة Rise Hostمشاركات: 0آخر مشاركة: 10-01-2021, 22:47 -
السي بانال CPanel امر اخذ باك اب حالي للسيرفر How to run a manual whm backup
بواسطة Rise Company في المنتدى رايز للاستضافة Rise Hostمشاركات: 0آخر مشاركة: 30-10-2020, 00:51 -
السي بانال CPanel اخذ باك اب كامل خارج السيرفر whm backup to Amazon S3
بواسطة Rise Company في المنتدى رايز للاستضافة Rise Hostمشاركات: 0آخر مشاركة: 29-10-2020, 15:46 -
السي بانال CPanel خاصية cpu and concurrent connection usage
بواسطة Rise Company في المنتدى رايز للاستضافة Rise Hostمشاركات: 0آخر مشاركة: 23-06-2020, 21:45 -
فايروول السي بانل Whm / Cpanel CSF Firewall شرح التثبيت Install
بواسطة Rise Company في المنتدى قسم فايروول CSFمشاركات: 0آخر مشاركة: 18-08-2019, 23:30

المفضلات