

السي بانال WHM/CPanel كيفية تثبيت ImageMagick يعمل 100 %
How to Install ImageMagick on cPanel Server
What is ImageMagick?
ImageMagick is software designed to display, convert, and edit raster and vector images. ImageMagick is fantastic for web performance It can be leveraged with PHP by installing the ImageMagick PHP extension on cPanel servers.
Step 1: Install ImageMagick on Centos
If you are using cpanel control panel on centos then you can also run this from the command line to install ImageMagick
CentOS 7 / CloudLinux 7
كود:yum install ImageMagick ImageMagick-devel -y
Step 2: Install the ImageMagick PHP Extension
The installation varies based upon which kind of PHP you want to use the extension with. You can use the extension with just EA-PHP or ALT-PHP, or you can use it with both simultaneously.
EA-PHP Extension via Command Line
Note:
You need to run all command as a root user
Find the binaries for PECL for all versions of PHP that you have installed:
find /opt/cpanel/ -iname pecl | grep bin
2. Run this command for each version of EA-PHP that needs to make use of the
3. On CloudLinux servers, CageFS needs to be updated after installing ImageMagick for EA-PHP. This is best done inside of a screen session:كود:extension:/opt/cpanel/ea-php74/root/usr/bin/pecl install imagick
screen -S updateCageFS
cagefsctl -u Reboot Server!.
Install EA-PHP Extension using WHM
Log in to WHM as the root user.
Navigate to Home »Software »Module Installers.
Click on the Manage link to the right of “PHP Pecl”.
Select the version of PHP from the drop-down menu, and click Apply.
Under “Install a PHP Pecl”, enter “imagick” (without the quotes).
Click “Install Now”.
If the server is CloudLinux update the cage by navigating to: Home »Plugins »CageFS User Manager
Then click on the “Update CageFS Skeleton” button on the bottom right
If you are using LiteSpeed or the LSAPI handler with mod_lsapi, you may also need to restart detached PHP processes before you can make use of the extension.
Install EA-PHP Extension in WHM Follow these 8 steps!
- Log in to WHM as the root user.
- Navigate to Home »Software »Module Installers.
- Click on the Manage link to the right of “PHP Pecl”.
- Select the version of PHP from the drop-down menu, and click Apply.
- Under “Install a PHP Pecl”, enter “imagick” (without the quotes).
- Click “Install Now”.
- If the server is CloudLinux update the cage by navigating to: Home »Plugins »CageFS User Manager
- Then click on the “Update CageFS Skeleton” button on the bottom right
- If you are using LiteSpeed or the LSAPI handler with mod_lsapi, you may also need to restart detached PHP processes before you can make use of the extension. The following article outlines how this is done:
After completing all these steps reboot your server and now ImageMagick has successfully installed on your cpanel server/centos7
------------------------------------
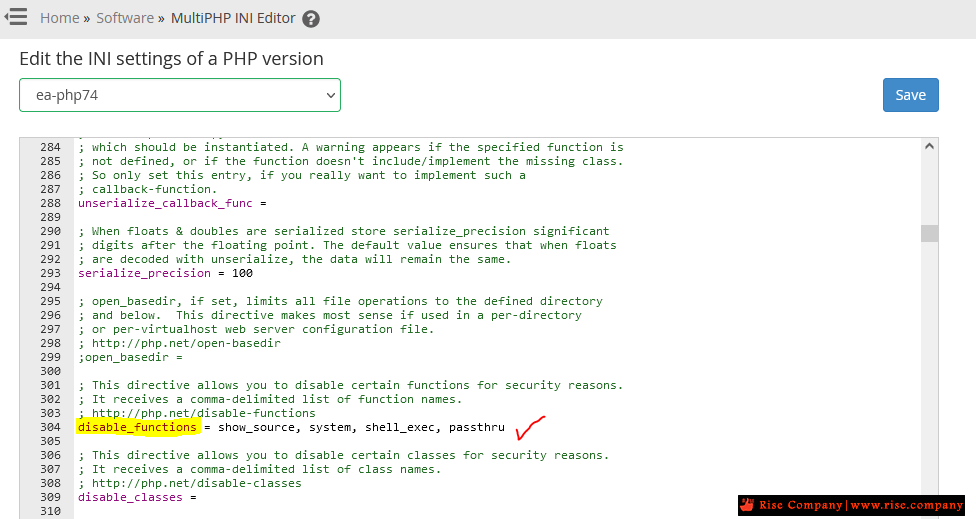
فى النهاية
داخل php هتجد disabled functions قم بازالة open + exec
Home »Software »MultiPHP INI Editor
لانها تمنع تثبيت ImageMagick
المرجع:
https://serverconfig.net/how-to-inst...cpanel-server/
https://www.servernoobs.com/863-2/
+ إنشاء موضوع جديد
النتائج 1 إلى 1 من 1
-
17-01-2022, 18:43 #1Status
- Offline

- تاريخ التسجيل
- Apr 2014
- الدولة
- Egypt
- المشاركات
- 4,618
 Engineering and Technology
- معدل تقييم المستوى
- 10
 السي بانال WHM/CPanel كيفية تثبيت بدون مشاكل ImageMagick يعمل 100 %
------------------------------------------------------------------------
السي بانال WHM/CPanel كيفية تثبيت بدون مشاكل ImageMagick يعمل 100 %
------------------------------------------------------------------------
شركة رايز للهندسة و التكنولوجيا Rise Company for Engineering & Technology
------------------------------------------------------------------------
Web Hosting | Web Designing | E-Marketing
رقم # 1 فى خدمات الشركات Business Services
استضافة مواقع Web Hosting - عمل ايميل شركة Business Emails
تصميم موقع شركة Web Design - تسويق الكترونى على جوجل Google Adwords
www.rise.company | www.rise.company/emails
ملحوظة : جميع خدماتنا مخصصة للشركات فقط وغير متاحة للافراد
وليس لنا اى منتجات او صيانة نهائيا! يرجى الانتباه الى ذلك.


 رد مع اقتباس
المواضيع المتشابهه
-
السي بانيل Cpanel | كيفية تثبيت Wordpress Toolkit فشل تثبيت There was a problem
بواسطة Rise Company في المنتدى رايز للاستضافة Rise Hostمشاركات: 0آخر مشاركة: 09-12-2021, 23:27 -
إنجن إكس Nginx كيفية تثبيته على السي بانال WHM/CPanel
بواسطة Rise Company في المنتدى رايز للاستضافة Rise Hostمشاركات: 0آخر مشاركة: 09-12-2021, 00:58 -
السي بانال CPanel و سنتوس ويب بنل CWP كيفية نقل الموقع والايميلات ؟
بواسطة Rise Company في المنتدى رايز للاستضافة Rise Hostمشاركات: 0آخر مشاركة: 24-08-2021, 12:43 -
السي بانال CPanel ازالة تثبيت / حذف uninstall ImageMagick
بواسطة Rise Company في المنتدى رايز للاستضافة Rise Hostمشاركات: 0آخر مشاركة: 19-07-2021, 18:17 -
السي بانال CPanel تثبيت install ImageMagick
بواسطة Rise Company في المنتدى رايز للاستضافة Rise Hostمشاركات: 4آخر مشاركة: 10-02-2021, 19:51

المفضلات